
I stood in the empty kitchen of my new house for about ten minutes the day we got the keys, holding a Starbucks cup and slowly realizing I had no idea where anything was. Not the water shutoff. Not the breaker panel. Not whether the previous owners had a security system, an alarm code, a backup spare. The closing folder said the gas was active, but I couldn't tell you which side of the house the meter was on. The seller had left a binder of warranty papers somewhere I hadn't found yet. The next family was scheduled to start unloading in forty minutes.
What I needed in that moment was not a Pinterest board of farmhouse decor. I needed a checklist. The honest, boring, practical, money-and-sleep-saving kind that nobody writes about because it doesn't make pretty photos. So this is that checklist — the one I wish someone had handed me, organized roughly by how panicked you should be about each item.
Order Matters
Do these in this order: security first, knowledge second, comfort third. A single Saturday gets you through the Day One list. The First Week and First Month items are spread out, but the Day One block is non-negotiable — that's the stuff that protects you from emergencies you can't Google your way out of in real time.
The First 24 Hours
Step 1
Change Every Lock That Day
The previous owner has keys. So does their realtor, your realtor, the inspector, the contractor who did the bathroom remodel three years ago, and the dog walker the previous owner used. None of these people are malicious. All of them have keys. You don't actually know how many keys are out in the world, and the closing process does not collect them.
You have two options. The cheap, fast option is a SmartKey rekey kit from any home improvement store — about $15 per lock if you already have Kwikset SmartKey hardware (look for the small slot next to the keyhole). Five minutes per lock, no skill required. The slightly-more-thorough option is to replace every exterior deadbolt and handle, which runs $30-80 per door but gives you brand-new hardware and a single new key for the whole house. Either way, before you sleep in the house the first night, every exterior lock should turn with keys nobody else on Earth has a copy of.
Garage door codes — both the keypad outside and the codes paired with car remotes — should be reset the same day. The instructions are in the manual on the unit itself, usually under a flip-up cover near the ceiling motor.
Step 2
Find the Four Emergency Shutoffs
If a pipe bursts at 2 a.m. on a Tuesday, the answer is not Googling "where is the water shutoff" while standing in two inches of water. The answer is knowing exactly where it is, because you found it on Saturday. Walk the house once with your phone and tag each of these four locations in your notes app. This is the single highest-value thirty minutes of your first day.
A Note on Gas
Gas is intentionally not on this list. The universal advice from every fire department and gas utility is: if you ever smell gas, leave the house, take everyone with you, and call 911 or the gas company from outside or a neighbor's home. Do not flip switches, do not light matches, do not go hunting for a shutoff. The right gas-safety move for a new homeowner is to find your gas company's emergency phone number on day one and save it in your phone. Operating gas valves in an emergency is the utility's job, not yours.
1. Main water shutoff
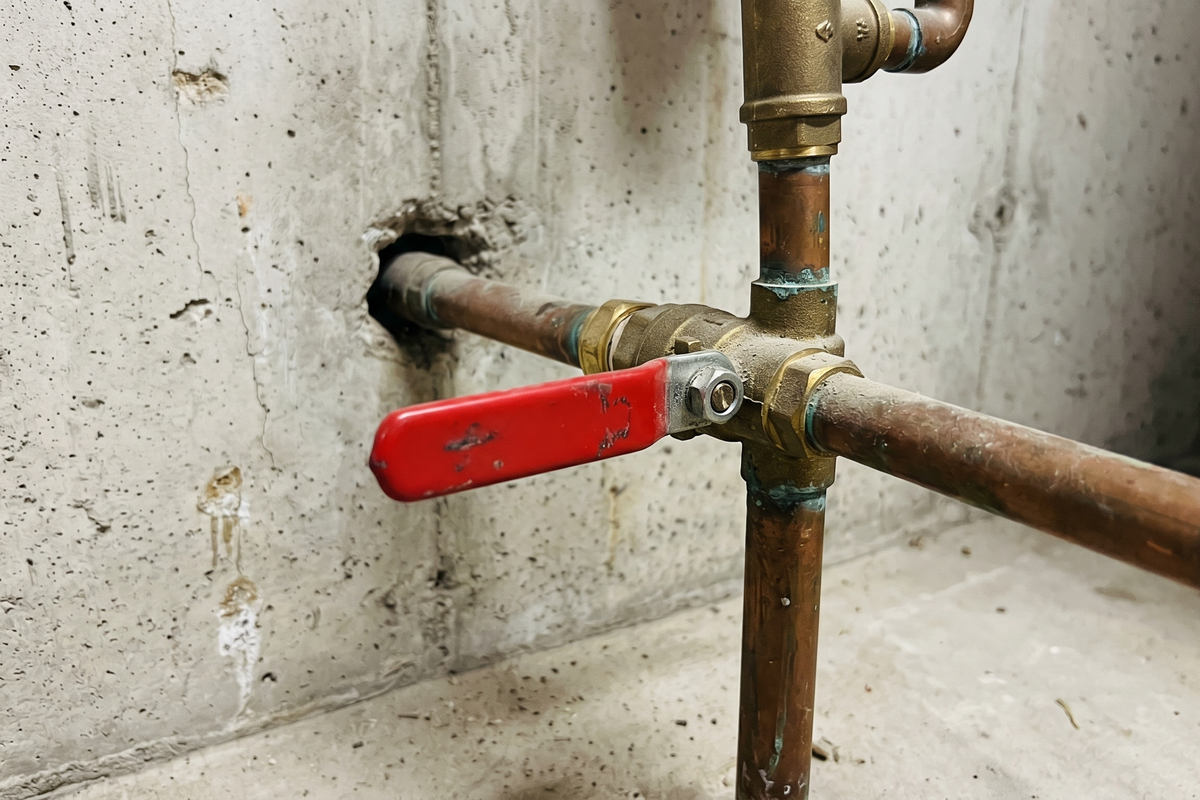
Where it lives: usually where the city's water line enters the house — basement wall facing the street, a crawl-space access, or inside a utility closet on a slab build. Outside, there's a second shutoff at the curb under a small metal lid, but the inside valve is the one you'll actually reach in a flood.
How to use it: if it's a lever-style ball valve like the one below, turn the lever ninety degrees until it sits perpendicular to the pipe — that's closed. If it's an older wheel-style gate valve, turn the wheel clockwise until it stops. Either way, the valve can be stuck from twenty years of never being moved, so test it once on your tour, gently, so you know it isn't seized when you need it.
2. Main electrical breaker
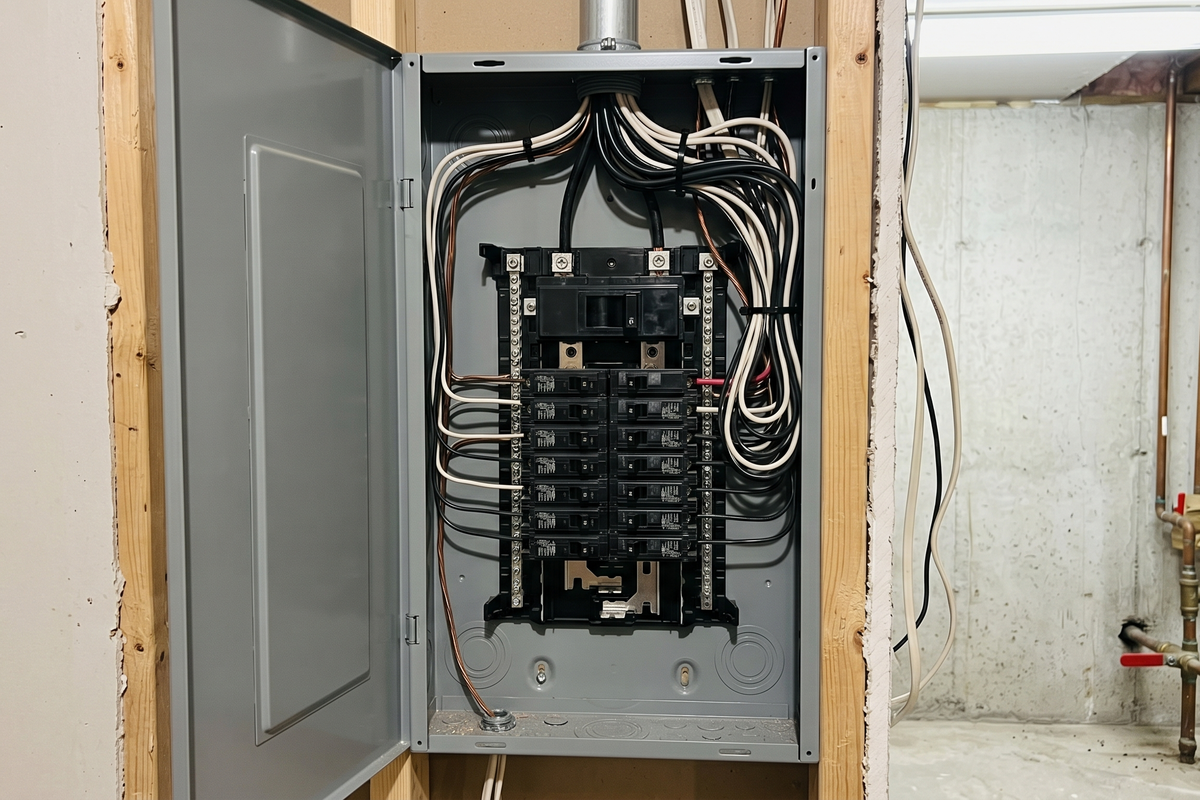
Where it lives: inside the breaker panel — a gray metal box typically in the basement, garage, utility closet, or (in older houses) a hallway. The main breaker is the largest single switch at the top of the panel, usually labeled with the service amperage (100A, 150A, 200A).
How to use it: flip the lever firmly from ON to OFF. This kills power to every circuit in the house. Use it before doing any electrical work on a circuit you can't isolate, or in an emergency like a fire or flooding water reaching outlets. Important caveat: the main breaker does not kill the wires feeding the panel itself from the meter — those bus bars stay live. Only the utility (or a licensed electrician pulling the meter) can fully de-energize the panel. Treat the line side of the main breaker as always-hot.
3. Water heater shutoff
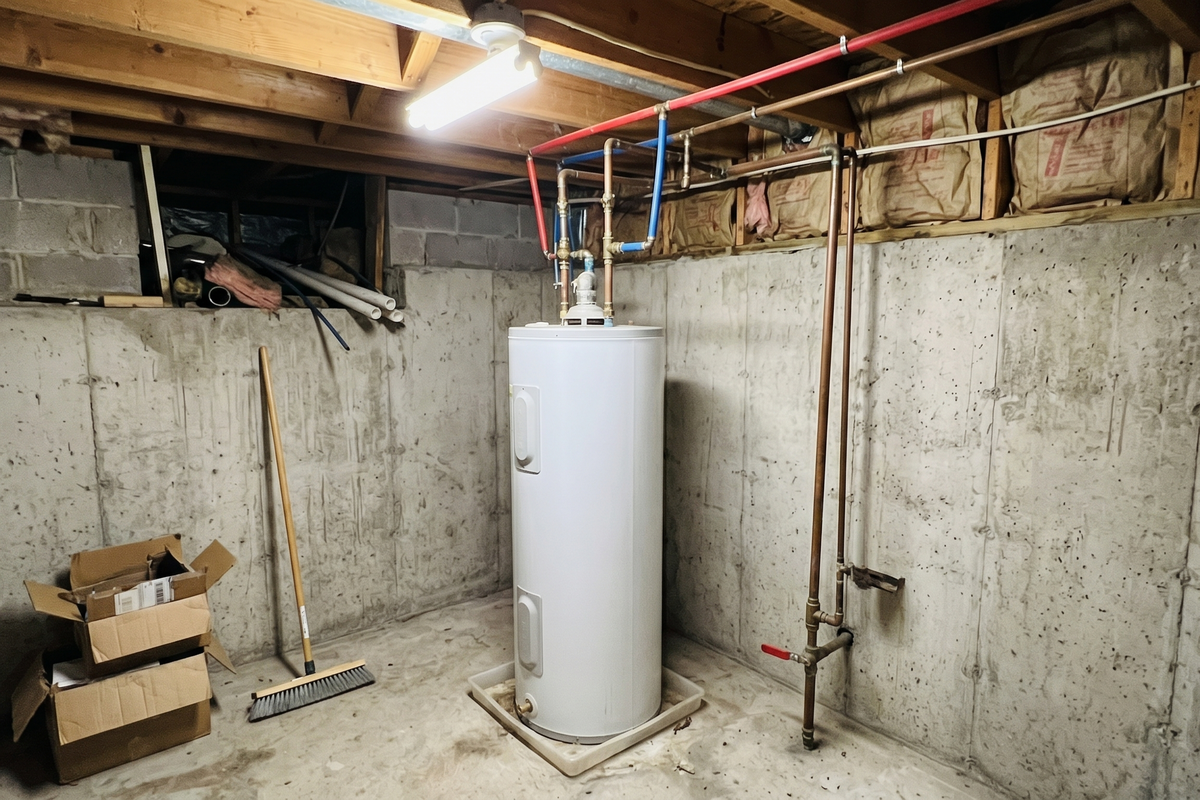
Where it lives: two shutoffs to know, both within arm's reach of the tank itself (usually a tall white or gray cylinder in a basement, garage, or utility closet). The water shutoff is a valve on the cold-water pipe feeding the top of the tank. The power shutoff is either a dedicated electrical switch on the wall nearby (for electric heaters) or a gas valve on the line entering the unit (for gas heaters).
How to use it: if the tank starts leaking or making strange popping noises, close the cold-water valve first to stop new water from entering, then kill the power or gas. Tag both shutoffs with a Sharpie or label tape so a babysitter or houseguest could find them in a hurry.
4. HVAC emergency switch
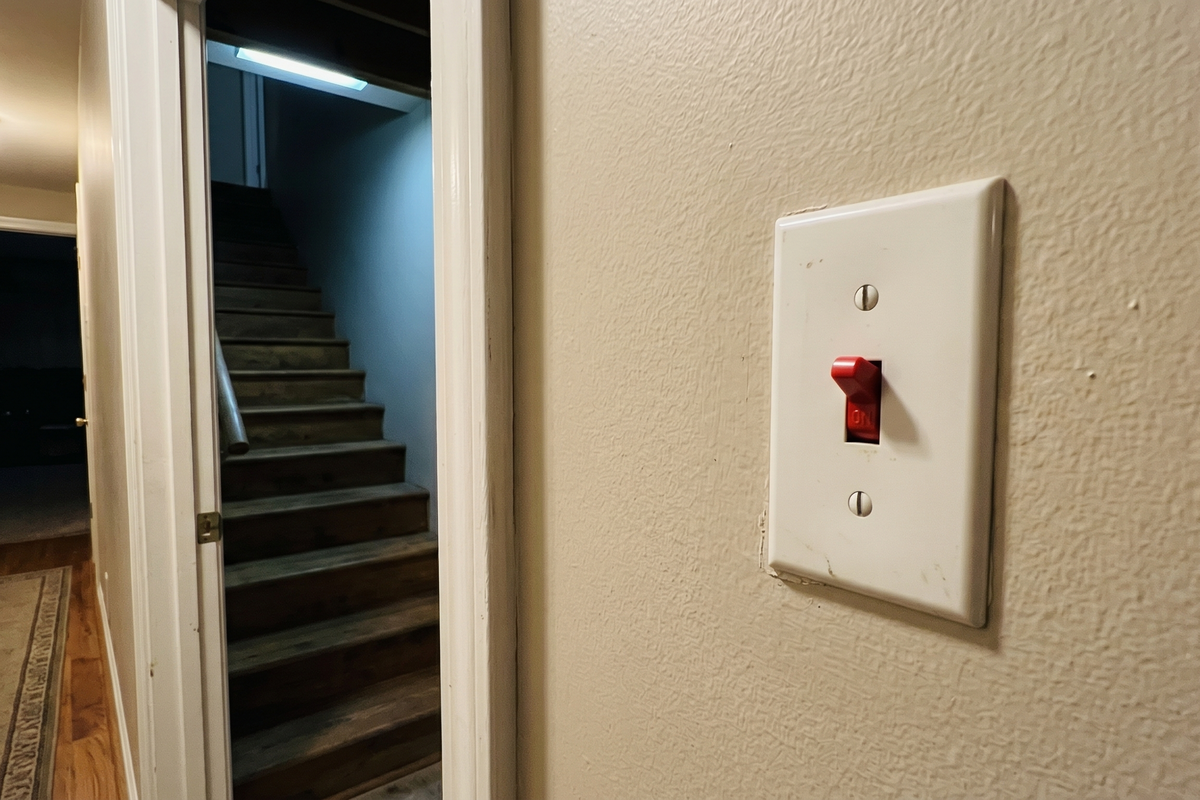
Where it lives: a single light-switch-style toggle, usually mounted on the wall at the top of the basement stairs, on a joist near the furnace, or beside the air handler. Code in many regions requires it; in older houses it may be missing. If you have a forced-air furnace and can't find an emergency switch within a few feet of the unit, that's worth a note for your first-year electrician visit.
How to use it: flip it down. The system shuts off immediately. Use it if the furnace is making burning smells, banging, or pushing visible smoke through the vents. For systems without a dedicated switch, the same effect comes from killing the HVAC breaker at the main panel — which is the backup plan whether you have an emergency switch or not.
Step 3
Test Every Safety Device
Smoke detectors and combination smoke / carbon-monoxide detectors live on a clock the previous owners may have been ignoring. Press and hold the test button on every detector in the house. A loud beep means it works. Silence (or a slow weak beep) means swap the battery now — and if any detector is more than ten years old (check the date stamped on the back), replace the whole unit. Combination smoke + CO detectors run about $30 each, last a decade, and are not the place to economize.
While you're at it: press the TEST button on every GFCI outlet in the house (the ones with TEST and RESET buttons, typically in kitchens, bathrooms, garages, and outdoor outlets). The outlet should click off. Press RESET to bring it back. If TEST does nothing, the outlet is dead and a hair dryer that falls in a sink won't trip it. Replace it.
Last safety check: garage door auto-reverse. Place a roll of paper towels on the floor in the path of the closing door and hit the wall button. The door should hit the roll and reverse. If it doesn't, the door's auto-reverse sensor is broken or misaligned, and that's the mechanism that prevents the door from crushing a child or a pet. Fix or service it before you sleep there.
The First Week
Step 4
Label Your Breaker Panel
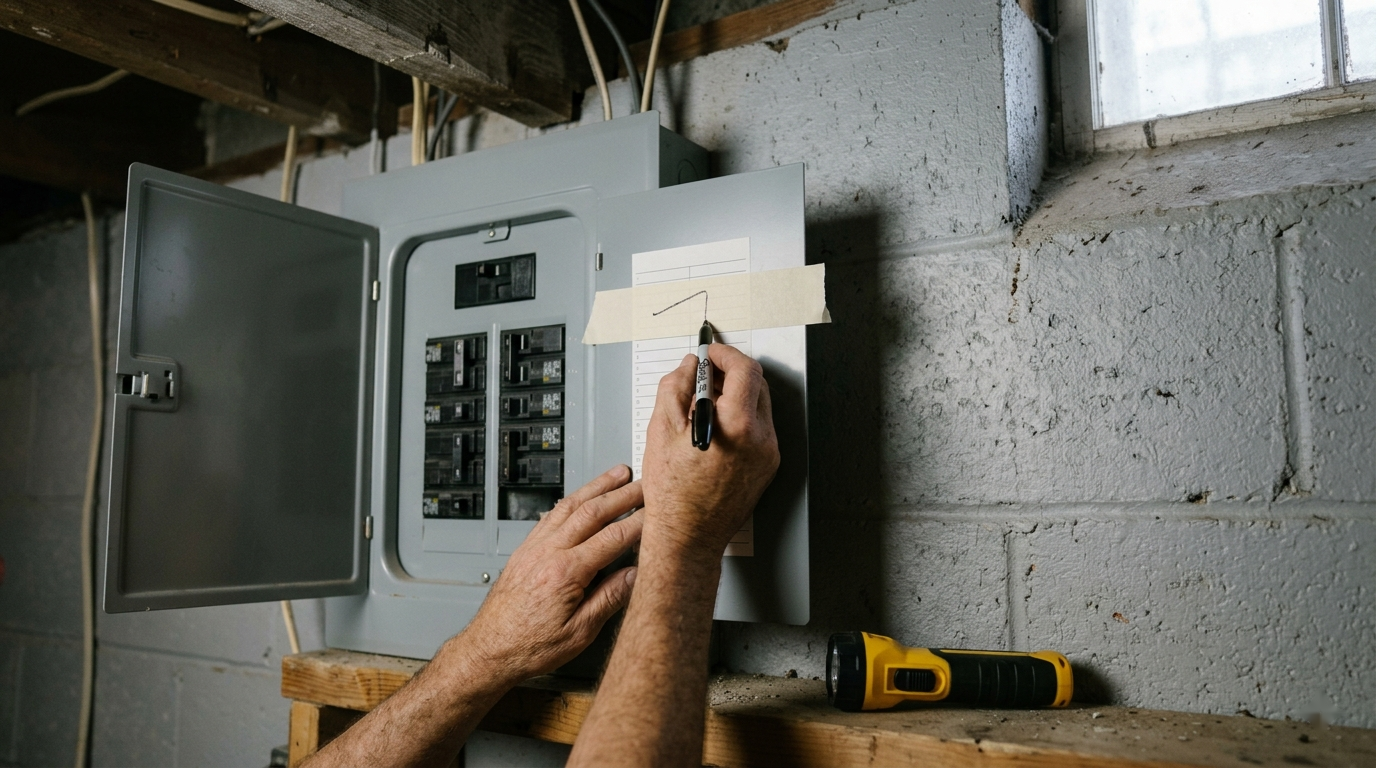
Almost no panel comes properly labeled from the previous owner. Either the labels are missing entirely, or they say things like "kitchen?" with a question mark, or they're written in the previous owner's handwriting in 1987 pencil and now refer to outlets that don't exist anymore. Fix this in your first week. It is a two-person, thirty-minute job that pays off every time you ever need to work on anything electrical for the rest of your time in the house.
Open the panel. Put one person at the panel and one person walking the house with their phone on speaker. The panel person flips one breaker at a time. The walker calls out every light or outlet that died. The panel person writes a fresh label on the panel directory (or directly on the inside of the door with a Sharpie). Work through every breaker. Don't forget to test outlets in bedrooms, the garage, and outside — those are the ones people forget and curse about later.
Pro Tip
Take a photo of the finished label list and email it to yourself. If the paper label ever falls off, gets ripped, or gets soaked when you finally fix that water heater, you've got a backup.
Step 5
Photograph Everything Before You Move Your Stuff In
This sounds excessive. It is the single most useful hour you'll spend in an empty house. Walk every room with your phone and take wide shots of every wall, the floor in each corner, every ceiling fixture, every window frame, every faucet and the cabinet underneath each sink. Get the basement, the attic, the garage, and the outside of the house from each direction.
You will use these photos for three things, in order of likelihood. First, for any insurance claim or warranty dispute (the previous-condition record is gold). Second, for any future DIY project where you need to remember what was behind the drywall before you painted over it. Third, in five years when you're trying to sell, you'll have a clear before-and-after of every improvement you made. Dump them all in a dedicated folder labeled with the move-in date. You'll be grateful at least once.
While you're at it: collect every appliance manual, warranty card, paint touch-up can, and HVAC service sticker the seller left behind. The seller is supposed to provide these but the binder is rarely complete. Photograph the model and serial number plates on the furnace, water heater, AC condenser, and major appliances — those are how you get parts and check warranty status when something fails.
Step 6
Inspect HVAC, Water Heater, and Sump Pump
Three systems run silently until they catastrophically don't, and all three reward you for checking them in your first week. Change the HVAC filter regardless of how it looks — fresh-start ritual, $10, takes five minutes, and now you have a known baseline for when you next need to swap it.
Find the water heater and look for the manufacture date stamped on the label (usually encoded in the first few characters of the serial number — most manufacturers use a year + week or month + year format). Tanks last 8–12 years on average. If you're sitting at year eleven of a tank's life, you don't replace it today — but you stop being surprised when it goes, and you've already pre-shopped what you'll buy in its place. Also worth knowing about: the anode rod, a sacrificial metal rod inside the tank that corrodes instead of the tank wall. It's accessed by a hex-head plug on top of the unit (usually under a plastic cap). Replacing the anode every 4–6 years can roughly double the tank's useful life — a $30 part and a 30-minute job, but most homeowners never do it because nobody told them it exists.
If the house has a sump pump (basement, low-lying area, or a pit with a pump inside): pour a five-gallon bucket of water into the pit and confirm the pump kicks on and pumps it out. A sump pump that fails during the first big spring storm is a $5,000 finished-basement repair. The test takes ten minutes and tells you in the first week whether it works.
The First Month
Step 7
Stock the Essential Toolkit (and the New-Home Extras)
If you're a first-time homeowner, the toolbox you used in an apartment is not enough. Build out the basics with the only 15 tools you actually need — that list covers 90% of jobs you'll encounter. Then add the new-homeowner extras: a spare HVAC filter the right size for your system, a couple of spare smoke detector batteries, a kitchen-rated fire extinguisher mounted near (but not directly above) the stove, a good plunger in both bathrooms, and a roll of painter's tape that lives in a drawer for the labeling jobs that always come up.
Step 8
Set Up Your Maintenance Calendar
The reason most homes age badly is not catastrophic events. It's a thousand small skipped maintenance items that quietly compound. Set up a recurring calendar reminder system the first month — monthly small items, seasonal big items — so you never have to remember what to do or when.
A reasonable starting cadence: check the HVAC filter monthly (replace every 1–3 months depending on filter type and household), test smoke detectors twice a year when the clocks change, and run a seasonal walkthrough every quarter. We've got the four seasonal checklists already written: the spring, May, summer, and (coming up) fall and winter versions. Put each one as a calendar event on the first weekend of the corresponding month and your future self will quietly hate you less.
Step 9
Know Who You'd Call Before You Need to Call
In your first month, find — by asking neighbors, checking local Facebook groups, or just calling around when you don't actually have an emergency — one plumber, one HVAC technician, and one electrician you'd be comfortable having in your house. Save their numbers in your phone with stars next to the names. The wrong time to be price-shopping is when there's water on the floor or it's 95 degrees and the AC just died.
Knowing the line where DIY ends matters too. The honest plumbing version is a good starting framework. The same logic applies to electrical and HVAC: most small jobs are DIY-friendly; some are not. A relationship with a trusted pro before you need one means you call them at 9 a.m. on a Tuesday, not 11 p.m. on Sunday with three other panicked homeowners ahead of you in the queue.
The Honeymoon Hour
Before you start any of this — before the locksmith, before the panel labeling, before the shutoff scavenger hunt — do one thing first. Sit in the empty house with the keys on the counter for one full hour. Don't open boxes. Don't read this checklist. Don't make phone calls. Just listen to the house. Notice which floors creak, which way the light moves through the kitchen, what the refrigerator hum sounds like, how cold the basement gets when the AC isn't running. You'll never have this version of the house again — silent, empty, and just yours. The boring work starts in an hour. It can wait that long.
When the hour is up, start with the locks. The most common first-week repair, by the way, is a leaky faucet you didn't notice during the inspection — so don't be surprised if that's your inaugural DIY project. Welcome home.
The New Home Move-In Checklist
Print this page and tape it to the fridge. Tick boxes as you go.
Day One — Security & Emergency Knowledge
- Rekey or replace every exterior lock (deadbolts and handle sets)
- Reset the garage door keypad code
- Re-pair car remotes to the garage door opener
- Locate the main water shutoff — test the valve once, gently
- Save the gas company's emergency phone number in your phone — if you ever smell gas, leave the house and call 911 or the gas company from outside (don't try to operate the gas shutoff yourself)
- Locate the main breaker inside the electrical panel
- Locate the water heater shutoffs — both cold-water valve and power/gas
- Locate the HVAC emergency switch (or note that it's missing)
- Test every smoke detector and CO detector; replace any 10+ years old
- Press TEST on every GFCI outlet; replace any that don't trip
- Test garage door auto-reverse with a roll of paper towels
First Week
- Label every breaker (two-person walkthrough with phones on speaker)
- Photograph the finished panel labels and email the picture to yourself
- Photograph every room, wall, ceiling, and corner before furniture moves in
- Photograph the model and serial plates on furnace, water heater, AC, and major appliances
- Collect appliance manuals, paint touch-up cans, and HVAC service stickers from the seller
- Change the HVAC filter (and note the size somewhere you'll find it again)
- Find the water heater's manufacture date; calculate age vs. 8–12 year lifespan
- Test the sump pump with a 5-gallon bucket of water (if you have one)
First Month
- Build out the 15-tool homeowner toolkit if you don't have it yet
- Add new-home extras: spare HVAC filter, spare 9V batteries, kitchen fire extinguisher, plunger in each bathroom, painter's tape
- Set up a recurring monthly reminder to check the HVAC filter
- Calendar the four seasonal walkthroughs (spring, summer, fall, winter)
- Add smoke detector test to your daylight-saving clock-change weekends
- Find and save numbers for one plumber, one HVAC technician, and one electrician you'd be comfortable having in your house
- Budget to have the water heater anode rod checked or replaced (a $30 part that doubles tank life)