My first winter as a homeowner, I watched my gas bill climb to $320 in January. Three-twenty. For a 1,600-square-foot house. Something was clearly wrong, but I had no idea where to start looking. So I did what any reasonable person would do — I turned the thermostat down to 64, put on two sweatshirts, and told myself this was just what homeownership costs.
It wasn't until the following fall that I did a proper walkthrough of the house looking for energy problems. What I found was embarrassing: gaps around three windows I could see daylight through, a completely uninsulated attic hatch, ductwork in the basement with tape falling off the joints, and a water heater cranked up to 140 degrees. I spent about $150 and a Saturday afternoon fixing the obvious stuff, and my heating bill dropped by nearly 25% that winter.
That's the power of an energy audit. You don't need fancy equipment or a professional (though we'll talk about when a pro makes sense). All you need is a few hours, a systematic approach, and the willingness to look at parts of your house you've probably been ignoring. Here's exactly how to do it.
What You'll Need
Audit Supplies
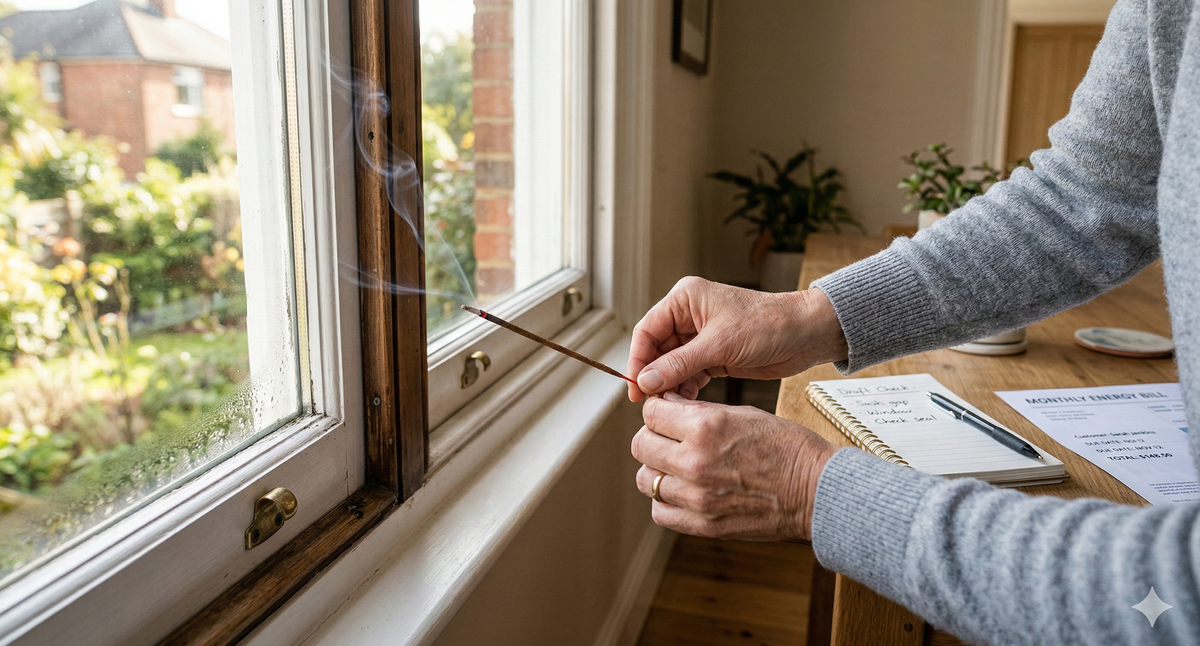
- An incense stick or thin tissue paper — for detecting air leaks
- A flashlight — for inspecting dark spaces like attics and crawl spaces
- A notepad or phone — to document what you find
- Your last 12 months of utility bills — most utility companies have this online
- A tape measure — for checking insulation depth
- A dollar bill — for testing door seals (seriously)
That's it. No thermal camera, no blower door, no specialized training. A DIY audit won't catch everything a professional would, but it will identify the biggest, most common energy wasters — which are usually the cheapest to fix.
Step 1: Read Your Energy Bills Like a Story
Before you walk around the house, pull up your utility bills from the last 12 months. Most utility companies have an online portal where you can see your usage history month by month. What you're looking for are patterns.
Which months are your most expensive? How much does your bill swing between the cheapest month and the most expensive? A big seasonal swing (especially in winter or summer) often points to heating and cooling losses — which means insulation and air sealing should be your focus. If your baseline bill (spring and fall, when you're not heating or cooling much) is still high, the issue might be appliances, lighting, or your water heater.
Write down your monthly costs. This is your baseline. When you make improvements, you'll compare against these numbers to see what's actually working.
Check if your utility offers a free audit. Many electric and gas companies offer free or heavily subsidized professional energy audits as part of their efficiency programs. Check your utility's website before paying for one out of pocket. Some even offer rebates on improvements like insulation and smart thermostats.
Step 2: Hunt for Air Leaks
Air leakage is the single biggest energy waster in most homes. The Department of Energy estimates that air leaks account for 25-30% of heating and cooling costs in a typical home. That's a massive number, and the good news is that most air leaks are cheap and easy to fix once you find them.
Here's how to find them: light an incense stick and slowly move it along the edges of windows, doors, baseboards, electrical outlets, switch plates, and anywhere pipes or wires penetrate an exterior wall. Where there's a draft, the smoke will waver, flutter, or blow sideways instead of rising straight up. No incense? A thin strip of tissue paper works the same way.
Common air leak locations
Check all of these — they're the usual suspects:
- Windows and doors — especially older ones. Check the frames, not just where they open and close
- Electrical outlets and switch plates on exterior walls — remove the cover plate and you'll often feel cold air flowing through
- Where pipes and wires enter the house — plumbing penetrations, electrical conduit, cable TV lines, dryer vent
- Recessed lighting (can lights) — especially in ceilings below an attic. These are notorious air leak paths
- The attic hatch or pull-down stairs — usually poorly sealed and uninsulated
- The fireplace damper — if the damper doesn't seal tightly when closed, you've got a chimney-sized hole in your house
- Where the foundation meets the framing (the sill plate) — often visible from the basement
- Mail slots, pet doors, and dryer vents — mechanical openings that don't always seal well when closed
Document every leak you find. Rate them as small (slight draft), medium (noticeable air movement), or large (you can feel it from a foot away). This helps you prioritize fixes.
How to fix air leaks
The fix depends on the size and location of the leak, but most are straightforward:
- Caulk for gaps and cracks smaller than 1/4 inch — around window frames, where trim meets walls, around pipe penetrations. Our caulking guide covers the technique.
- Weatherstripping for moving joints — door frames, operable windows, attic hatches
- Expanding foam for larger gaps — around pipes, wires, and other penetrations through exterior walls
- Foam gaskets for electrical outlets on exterior walls — these slip behind the cover plate and cost about $0.25 each
- Door sweeps for gaps under exterior doors — install or replace if you can see light under the door
Total cost for a typical house? Usually $30-75 in materials covers everything. This is the highest-return investment on this entire list.
Step 3: Inspect Your Insulation
Insulation is your home's thermal barrier — it keeps heat inside during winter and outside during summer. If your insulation is inadequate, thin, or missing in spots, your HVAC system has to work overtime to compensate.
The attic
The attic is the most important area to check because heat rises, and an under-insulated attic is like leaving a window open on the top floor of your house. Grab your flashlight and tape measure and poke your head up there.
For most climates, you want at least R-38 to R-60 in the attic, which translates to roughly 10-16 inches of fiberglass batt or blown-in insulation. If you can see the tops of the floor joists, you don't have enough. The insulation should be at or above the joist level, with an even layer across the entire attic floor.
Look for trouble spots: areas where insulation is compressed (it doesn't insulate well when squished), gaps around pipes and wires, missing insulation around the attic hatch, and thin spots near the eaves where the roof slope meets the attic floor.
Safety note: If your home was built before 1980, the insulation might contain asbestos (especially if it's loose-fill vermiculite). Don't disturb it. If you're not sure what you're looking at, have a professional inspect it before you do anything. Asbestos is harmless when undisturbed but becomes dangerous when the fibers are released into the air.
Walls and basement
Wall insulation is harder to check without cutting holes, but there are clues. If your exterior walls feel noticeably cold to the touch in winter (compared to interior walls), they may be under-insulated or uninsulated. Older homes (pre-1970s especially) frequently have no wall insulation at all.
In the basement or crawl space, check whether the rim joist area (where the foundation meets the wood framing) is insulated. This is one of the most commonly missed spots and is easy to insulate yourself with rigid foam board or spray foam.
Step 4: Evaluate Windows and Doors
Windows and doors are the thinnest parts of your building envelope, and they're responsible for a significant chunk of energy loss — especially if they're older.
The dollar-bill test: Close an exterior door on a dollar bill so it's pinched between the door and the frame. Try to pull the bill out. If it slides out easily, the weatherstripping isn't sealing properly and air (and energy) is escaping. Do this on all four sides of every exterior door.
Single-pane windows are major energy losers. If your home still has single-pane windows, they're costing you a noticeable amount in heating and cooling. Replacement windows are expensive ($300-1,000+ per window installed), but there are intermediate steps: interior storm window inserts ($60-120 per window), window film kits ($5-10 per window), and heavy thermal curtains all help significantly while you save up for replacements.
Check the glazing compound on older windows — that's the putty that holds the glass in the frame. If it's cracked and falling out, it's creating air leaks and the glass could eventually come loose. Re-glazing a window is a straightforward DIY job with a putty knife and glazing compound.
Step 5: Assess Your HVAC System
Your heating and cooling system is the biggest energy consumer in your home — typically 40-60% of your total energy use. Even small improvements in its efficiency translate to real savings.
Check the filter. Yes, again. A dirty filter is the most common cause of HVAC inefficiency and the easiest thing to fix. If you haven't read our HVAC filter guide, it covers everything you need to know.
Inspect accessible ductwork. If you have exposed ducts in the basement, attic, or crawl space, look for disconnected sections, visible holes, and joints where the tape or mastic has failed. Leaky ducts can waste 20-30% of the air your system moves — you're literally paying to heat or cool your basement and attic instead of your living spaces. Duct sealing with mastic (not duct tape, ironically) is a high-impact DIY fix.
Note the system's age. If your furnace or AC is more than 15-20 years old, it's likely operating at 60-80% of the efficiency of a modern unit. Replacement is expensive, but it's worth factoring into your long-term plans — especially since many utility companies offer rebates on high-efficiency replacements.
Check your thermostat. If you're still using a basic manual thermostat, upgrading to a programmable or smart thermostat ($25-250) lets you automatically reduce heating and cooling when you're asleep or away. The Department of Energy estimates this saves 8-15% on heating and cooling costs. A smart thermostat like the Ecobee or Nest learns your schedule and adjusts automatically.
Step 6: Audit Lighting and Appliances
This section is the quickest to assess and often has easy wins.
Lighting: Walk through every room and note any incandescent bulbs still in use. If you haven't switched to LED bulbs yet, this is one of the simplest upgrades you can make. LEDs use 75% less energy than incandescent bulbs and last 25 times longer. A single LED bulb saves about $5-10 per year in electricity compared to an incandescent. Multiply that by however many bulbs you have in your house. The math adds up fast.
Appliances: Check the age and energy rating of your major appliances — refrigerator, dishwasher, washing machine, and dryer. An old refrigerator (15+ years) can use twice the electricity of a modern Energy Star model. You don't need to replace everything at once, but when an appliance dies, always replace it with an Energy Star-rated model.
Phantom loads: Electronics and appliances draw power even when they're turned off — this is called phantom load or vampire power. It typically adds $100-200 per year to your electric bill. The biggest offenders are TVs, game consoles, cable boxes, desktop computers, and anything with a display or clock. Smart power strips ($15-30) automatically cut power to devices when they're not in use.
Step 7: Check Your Water Heater
Water heating is typically the second-largest energy expense in a home (after HVAC), accounting for about 18% of your energy bill.
Check the temperature setting. Many water heaters come from the factory set to 140°F, but 120°F is sufficient for most households. Lowering the temperature from 140 to 120 saves 6-10% on water heating costs and reduces the risk of scalding. There's usually a dial on the front of the tank — look for the settings or use a kitchen thermometer at the tap.
Feel the tank. If your water heater tank is warm to the touch, it's losing heat through the walls. An insulating blanket ($20-30) wraps around the tank and reduces heat loss. Check your owner's manual first — some newer, well-insulated models don't benefit from a blanket, and some gas water heaters require you to keep the blanket away from the vent at the top.
Insulate hot water pipes. Any exposed hot water pipes in unheated spaces (basement, crawl space, garage) should be wrapped with foam pipe insulation. It's about $1 per 6-foot section, takes minutes to install, and keeps the water hotter as it travels to your faucets — which means you wait less time for hot water and waste less.
Note the age. Most tank water heaters last 8-12 years. If yours is approaching that range, start researching replacements before it fails. A tankless (on-demand) water heater costs more upfront but can save 8-34% on water heating costs depending on your usage, and they last 20+ years.
Prioritize Your Fixes
Now that you have a list of every issue you found, it's time to prioritize. Not all improvements have equal payoff, and you don't need to do everything at once. Here's a general ranking by return on investment:
| Fix | Typical Cost | Annual Savings | Payback Period |
|---|---|---|---|
| Air sealing (caulk, foam, weatherstripping) | $30-75 | $100-250 | 2-6 months |
| Attic insulation (DIY blown-in) | $300-600 | $150-350 | 1-3 years |
| Programmable thermostat | $25-250 | $100-200 | 2-18 months |
| LED bulb conversion | $30-80 | $75-200 | 3-6 months |
| Duct sealing | $50-100 DIY | $100-300 | 3-12 months |
| Water heater adjustments | $0-30 | $30-80 | Immediate-6 months |
| Window film or storm inserts | $50-500 | $50-150 | 1-4 years |
Start with air sealing — it's the cheapest, fastest, and usually the highest-impact fix. Then work your way down the list based on what you found during your audit. Keep tracking your utility bills month by month so you can see the improvements in real numbers.
Look into rebates and tax credits. The Inflation Reduction Act provides significant tax credits for energy efficiency improvements including insulation, heat pumps, and energy-efficient windows and doors. Many state and local utilities offer additional rebates. The Database of State Incentives for Renewables & Efficiency (DSIRE) at dsireusa.org is the best resource for finding what's available in your area.
Frequently Asked Questions
How much can a DIY energy audit save me?
Most homeowners who follow through on the fixes save 5-30% on their energy bills. The biggest savings come from air sealing and insulation, which are among the cheapest fixes on the list. The key is actually doing the repairs — the audit itself just identifies the opportunities.
Do I need special equipment for a home energy audit?
Not for a basic DIY audit. An incense stick for detecting drafts, a flashlight, and your utility bills are all you need. A professional audit uses blower doors and thermal cameras for more precise results, but your DIY walkthrough will catch the most common and impactful issues — which are often the ones a pro would flag first anyway.
What's the difference between a DIY and professional energy audit?
A professional audit ($200-500) uses specialized equipment to measure exactly how much air your home leaks and pinpoint every insulation gap. A DIY audit catches the obvious problems, which are usually the biggest energy wasters. Start with DIY, fix what you find, and consider a professional audit if your bills are still higher than expected.
Is a professional energy audit worth it?
If your bills are unusually high and you've already fixed the obvious stuff, yes. Also worth it before major renovations or solar panel installation. Many utility companies offer free or subsidized audits — always check with your provider first. The audit pays for itself many times over if you follow through on the recommendations.