
Painting a room is one of those projects that seems like it should be simple. You buy some paint, grab a roller, slap it on the walls, and you're done by lunch. Right? Well, not exactly. I've painted more rooms than I can count at this point, and here's what I've learned: the actual painting part is the easy part. It's everything else — the prep, the technique, the little details — that makes the difference between a room that looks like a professional did it and one that looks like you rushed through it on a Saturday afternoon.
The good news is that painting a room really is a beginner-friendly project. You don't need any special skills or expensive equipment. But there are a handful of things that nobody seems to mention when they tell you to "just paint it," and those are the things that'll save you from frustration, wasted paint, and that sinking feeling when you peel the tape off and see a wobbly line.
So let me walk you through how to paint a room from start to finish — the way I actually do it, including the shortcuts that work and the ones that definitely don't.
Choosing Your Paint (It Matters More Than You Think)
Before you touch a single wall, you need to pick your paint. And I don't just mean the color, though that's obviously a big part of it. I'm talking about the type of paint and the sheen, because getting these wrong can cause headaches down the road.
For interior walls, you want an acrylic latex paint. That's the standard for pretty much every room in your house. It cleans up with water, it dries relatively fast, and it doesn't have that overpowering smell that oil-based paints have. Most of the big brands — Benjamin Moore, Sherwin-Williams, Behr — make excellent options. I've used all three and honestly, at the mid to upper price range, they're all solid.
Now here's where people get tripped up: the sheen. Paint comes in different finishes ranging from completely flat to high gloss, and each one has its place. Flat or matte finishes hide wall imperfections beautifully but they're harder to clean, so they work best in bedrooms and low-traffic areas. Eggshell is a slight step up with just a hint of sheen and a bit more durability — great for living rooms and dining rooms. Satin is my go-to for most rooms because it's durable, easy to wipe clean, and still looks great on walls. It works especially well in kitchens, hallways, and kids' rooms. Semi-gloss should really be reserved for trim, doors, and baseboards where you want that extra durability and shine.
One thing I wish someone had told me years ago: don't choose your paint color from a tiny swatch at the store. Those things are basically useless on their own. Instead, get a few sample pots and paint large patches on your wall — at least twelve inches square. Then live with them for a full day. Look at them in the morning light, the afternoon sun, and at night under your lamps. Colors change dramatically depending on the light, and that "perfect gray" you picked out can look blue, purple, or green depending on what's happening with the light in your room. Trust me, spending ten bucks on samples will save you from buying two gallons of a color you end up hating.
The Supply List (What You Actually Need)
You don't need a ton of stuff to paint a room, but you do need the right stuff. Here's what I grab before every paint job: a good angled brush in the two-and-a-half inch size for cutting in around edges, a nine-inch paint roller frame with a roller cover (three-eighths inch nap for smooth walls, half-inch nap for slightly textured walls), a paint tray, painter's tape, a pack of two-twenty grit sandpaper or sanding sponges, a putty knife, lightweight spackle, drop cloths, and a step ladder.
A quick note on drop cloths — canvas is the way to go. I know plastic is cheaper, but plastic is slippery and it doesn't absorb drips. You step in a wet spot on a plastic drop cloth and suddenly you're skating across your living room with paint on your feet. Ask me how I know. Canvas stays put, absorbs spills, and you can reuse it for years.
And please, don't cheap out on your roller covers and brushes. A three-dollar brush will leave bristles in your paint and give you streaky lines when you're trying to cut in. A decent angled brush costs around eight to twelve bucks and will last you through multiple paint jobs if you clean it properly. Same with roller covers — the cheap ones shed fuzz into your wet paint and leave a textured, bumpy finish that'll drive you crazy.
Prep Work: The Part Nobody Wants to Do
Here's the uncomfortable truth about painting a room: the prep work takes longer than the actual painting. And if you skip it or rush through it, you'll see every shortcut in the finished product. I know it's boring. I know you want to just start rolling paint. But this is where the magic actually happens.
Start by clearing out the room as much as possible. Move furniture to the center and cover it, or better yet, get it out entirely. Take down curtains, remove outlet covers and light switch plates (this takes two minutes and makes a huge difference), and pull any nails or picture hangers out of the walls.
Next, inspect the walls. You're looking for nail holes, dents, cracks, or any imperfections that need filling. Grab your spackle and putty knife and fill every single one. I know it seems tedious, but here's the thing — paint doesn't hide imperfections. It highlights them. Especially in a satin or eggshell finish, every unfilled nail hole is going to catch the light and stare back at you. Let the spackle dry completely (usually about thirty minutes for small patches), then sand it smooth with your two-twenty grit sandpaper. Run your hand over it — if you can feel a ridge or bump, sand it more.
Once the patching is done, give the walls a once-over with a damp cloth or sponge to remove dust, cobwebs, and any grime. This doesn't need to be a deep clean unless the room is particularly dirty — like a kitchen with grease buildup, where you'd want to wipe things down with a TSP solution or a degreaser. For most rooms, a quick wipe is fine.
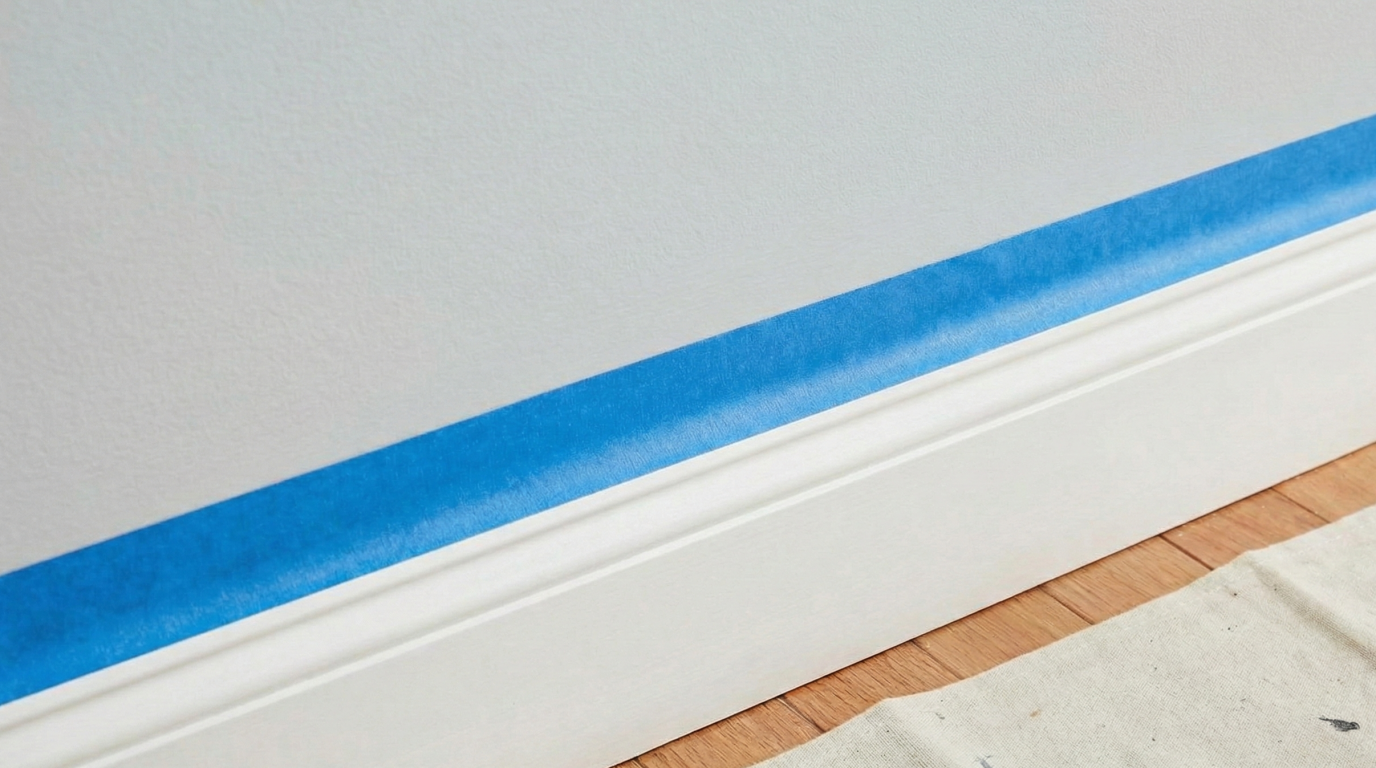
Now it's taping time. Run painter's tape along your baseboards, window frames, door frames, and along the ceiling line if you're not painting the ceiling. Press the edge of the tape down firmly so paint can't sneak underneath — I run my fingernail or a credit card along the edge to seal it tight. This one little step is the difference between clean lines and messy, bleeding edges. If you skip it, you'll spend twice as long doing touch-ups afterward.
Do You Need Primer?
This is one of those questions that gets a different answer depending on who you ask. Here's my take: you don't always need a separate primer, but there are situations where skipping it is a mistake.
If you're painting over a similar color with a decent paint that has primer built in (most mid-range and premium paints do these days), you're probably fine without a standalone primer. Two coats of good quality paint-and-primer will give you solid coverage.
But you absolutely need primer if you're covering a dark color with a lighter one. Trying to paint white over dark navy without primer is an exercise in frustration — you'll be putting on four or five coats and still see the old color bleeding through. A coat of good primer blocks that out in one shot and saves you time and paint in the long run. You also want primer on new drywall patches, on any stains or water marks (use a stain-blocking primer for those), and if you're switching from oil-based paint to latex. When in doubt, prime it. It adds maybe forty-five minutes to your project and eliminates a lot of potential problems.
The Right Order to Paint a Room
Order matters. If you just start painting whatever surface you feel like, you'll end up with drips on finished surfaces and a lot of unnecessary touch-up work. Here's the sequence that works best.
Paint the ceiling first. The ceiling is the messiest part of the job because gravity is not on your side. No matter how careful you are, tiny droplets and spatters are going to come down. If you've already painted the walls, you'll be wiping ceiling paint off them. So get the ceiling done first, let it dry, and move on. Use a flat or matte white paint for ceilings — it hides imperfections in the drywall texture and doesn't reflect light in distracting ways. A roller with an extension pole makes this job way easier so you're not constantly climbing up and down a ladder.
Next, do the trim. I know some people paint trim last, and that's fine too, but I prefer doing it before the walls. Here's why: when you paint trim first, you don't have to be super precise where the trim meets the wall. You can overlap onto the wall a little and it won't matter because you're going to paint over it. Then when you paint the walls, you only have to make one clean cut line where the wall color meets the trim — instead of two. It's faster and you end up with a cleaner result.
Finally, paint the walls. This is the fun part. Everything else has been prep and detail work, but rolling paint onto walls is satisfying and goes quickly once you're set up.
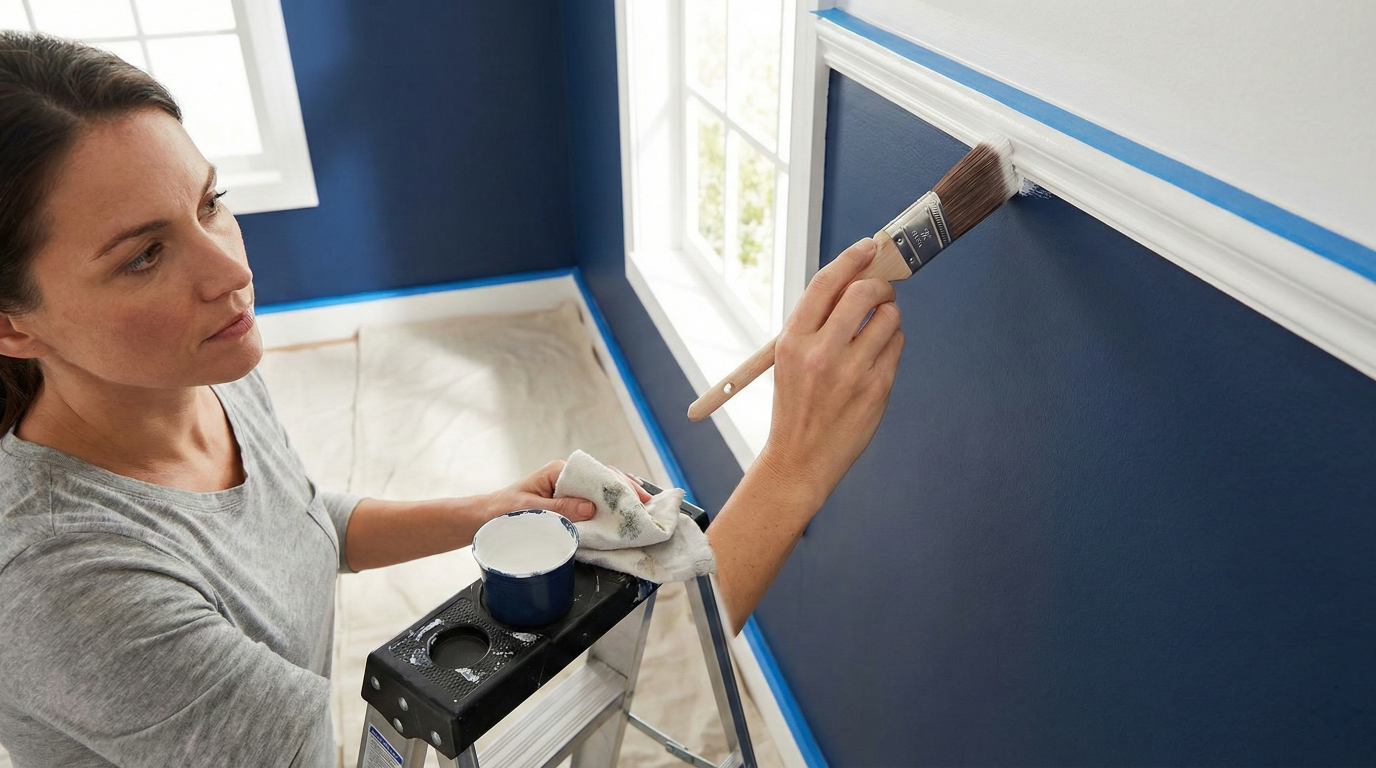
Cutting In: The Skill That Makes or Breaks Your Paint Job
Cutting in is the process of painting a clean line along edges — where the wall meets the ceiling, along trim, around windows, and in corners. This is hands down the most important technique to learn, because the edges are what your eye notices first when it looks at a painted room.
Load your angled brush by dipping it about a third of the way into the paint. Tap off the excess — don't wipe it across the edge of the can, just tap each side gently against the inside. You want a loaded brush, not a drippy one.
Now, start about half an inch away from the line you're cutting against and gently push the bristles toward the edge, letting the paint flow into the corner. The angled bristles will create a natural straight line if you let them. Don't try to get right up to the edge on your first pass — you'll overshoot and get paint where you don't want it. Start slightly away, then work closer. You're painting a band about two to three inches wide along every edge.
Here's a tip that honestly changed the game for me: don't try to cut in the entire room before you start rolling. Cut in one wall at a time, then roll that wall while the cut-in edges are still wet. This prevents visible lines where the brushed paint meets the rolled paint. If you cut in the entire room first, those edges will dry before you get to them with the roller, and you'll see a slightly different texture where the brush marks meet the roller marks. Professionals call these "hat bands" and they're one of the most common amateur mistakes.
Rolling the Walls
Once you've cut in a wall, it's time to roll. Pour paint into your tray, load your roller by rolling it through the paint a few times, then roll it back and forth on the grate (the ridged part of the tray) to distribute the paint evenly. Your roller should be fully covered but not dripping.
Start at the top of the wall near the ceiling and roll in a large W or M pattern across a three-to-four-foot section. This distributes the paint evenly. Then go back over the same section with light, straight up-and-down passes to smooth everything out. Overlap your strokes slightly and maintain a "wet edge" — meaning you always want to be rolling into paint that's still wet. If you let one section dry and then roll next to it, you'll get visible lap marks.
Work your way across the wall one section at a time, always rolling from the dry area into the wet area. Keep a consistent pressure — don't press too hard or you'll squeeze the paint off the roller and create drips. Let the roller do the work.
When you need to reload the roller, don't just slap it back on the wall and start rolling from the same spot. Start slightly overlapping the area you just painted so there's no gap or hard line where you stopped.
The Second Coat
You're going to need a second coat. I don't care what the can says about "one coat coverage." Yes, some premium paints cover better than others, but for a truly consistent, professional-looking finish, two coats is the standard. The first coat will look blotchy and uneven as it dries, and that's completely normal. Don't panic and start adding more paint to thin spots while the first coat is wet — you'll just create a mess. Let it dry fully.
Most interior latex paints need two to four hours of drying time between coats, though this varies with humidity and temperature. You'll know it's ready when the paint feels dry to the touch and has a uniform appearance — no shiny wet spots. When in doubt, wait a little longer. Applying a second coat over paint that isn't fully dry can cause peeling, bubbling, or a tacky finish that never fully cures.
The second coat goes on the same way as the first: cut in, then roll. It goes faster because the first coat sealed the surface and the paint covers more evenly. This is the coat that really brings the color to life and gives you that solid, consistent finish.
Removing the Tape (Don't Mess This Up)
You've done all this work, the walls look fantastic, and now it's time to peel off the painter's tape. This feels like the celebration moment, but slow down — there's a right way and a wrong way to do this.
The best time to remove tape is when the final coat is slightly tacky but not fully dry. If you wait until the paint is completely cured, the tape can pull dried paint off with it, leaving jagged, chipped edges. If you pull it too early, wet paint can run under the tape line.
Pull the tape at a forty-five degree angle, away from the painted surface. Go slowly and steadily — don't rip it off like a bandage. If you see any spots where the paint bridged over the tape, use a utility knife to score along the edge before pulling. This prevents tearing.
Clean Up and Storage
Once you're done, clean your brushes and rollers right away. Latex paint cleans up easily with warm water when it's fresh, but once it dries in the bristles, that brush is done. Run water through the brush and work the bristles with your fingers until the water runs clear. Squeeze out the excess, reshape the bristles, and hang or lay it flat to dry.
For leftover paint, seal the can tightly by tapping the lid down with a rubber mallet (not a hammer directly on the lid — that can bend it and break the seal). Write the color name, where you used it, and the date on the can with a Sharpie. Store it somewhere that doesn't freeze. You'll want this for touch-ups down the road, and there's nothing worse than trying to match a paint color from memory at the store two years later.
Common Mistakes to Avoid
After painting dozens of rooms, I've made pretty much every mistake in the book. Here are the ones I see most often and wish I'd known about from the start.
Not stirring the paint enough. Paint settles in the can, with the pigments sinking to the bottom. If you don't stir it thoroughly before starting — and occasionally during the project — you'll get inconsistent color. I stir for a solid two minutes before I start, and again every time I refill the tray.
Painting at night. I learned this one the hard way. Artificial light flatters your paint job. You think everything looks great, you go to bed feeling accomplished, and then the morning sun comes in and reveals every missed spot, every streak, every thin area. Do your painting during daylight hours whenever possible. If you must paint at night, go back the next morning with a critical eye and do touch-ups.
Overloading the brush or roller. More paint does not mean better coverage. It means drips, sags, and a thick, uneven finish that takes forever to dry. Load your brush or roller with a moderate amount and apply it in thin, even coats. Two thin coats will always look better than one thick one.
Forgetting to sand between coats. If you spot any drips, bumps, or debris in your first coat, lightly sand them smooth before applying the second coat. A quick once-over with fine sandpaper takes five minutes and prevents imperfections from getting locked in permanently.
Skipping the drop cloths. I know it seems like you'll be careful enough. You won't be. Paint drips happen. Rollers splatter. A drop cloth takes sixty seconds to lay down and can save you from a disaster on your hardwood floors or carpet that's way harder to fix than just doing the prep right.
Frequently Asked Questions About Painting a Room
How long does it take to paint a room?
For an average bedroom (roughly ten by twelve feet), plan on about four to six hours of active work spread over a day or weekend. That includes prep, two coats of paint, and cleanup. Larger rooms, rooms with lots of trim, or rooms where you're doing significant wall repair will take longer. I usually plan a full Saturday for a standard room.
How much paint do I need for a room?
One gallon of paint covers roughly three hundred fifty to four hundred square feet with one coat. For a standard ten-by-twelve bedroom with eight-foot ceilings, you'll need about one and a half gallons for two coats on the walls. I always buy two gallons to be safe — most stores will let you return an unopened gallon. Running out mid-project and trying to match a new batch is not fun.
Do I need to use primer before painting?
Not always. If you're painting over a similar color with a quality paint-and-primer combo, you can usually skip standalone primer. However, primer is essential when covering dark colors, painting over stains or water damage, working with new drywall, or switching from oil-based to latex paint. When in doubt, a coat of primer is cheap insurance.
What order should I paint a room?
Ceiling first, then trim, then walls. The ceiling is the messiest part and spatters will fall down. Painting trim before walls means you only need to cut one clean line where the wall meets the trim. Some people prefer walls then trim — both work, but I find ceiling-trim-walls to be the most efficient sequence.
Can I paint a room in one day?
Yes, absolutely — if the room is reasonably sized and you start early. Apply the first coat in the morning, let it dry for two to four hours over lunch, then apply the second coat in the afternoon. The key factors are temperature and humidity. Warm, dry conditions speed up drying time. Cold or humid days will slow you down considerably.
What's the best paint sheen for interior walls?
For most rooms, satin or eggshell are your best bets. Satin is slightly more durable and easier to clean, making it ideal for kitchens, hallways, bathrooms, and kids' rooms. Eggshell has a softer look and works beautifully in bedrooms, living rooms, and dining rooms. Flat or matte is best for ceilings and low-traffic areas where you want to hide wall imperfections.
Paint Calculator
Plug in your room dimensions and find out exactly how much paint you need — no guessing, no extra trips to the store.
Painting a room is genuinely one of the most satisfying home improvement projects you can tackle. There's something about walking into a freshly painted space that just feels right. The prep work isn't glamorous and cutting in takes practice, but the results are immediate and visible in a way that most home projects aren't. Start with a small room like a bathroom or a closet if you're nervous, get your technique down, and then work your way up to the bigger spaces. Before you know it, you'll be the person your friends call when they need painting advice.