I woke up at 2 AM to a sound I couldn't quite place. Not dripping, not gushing — just this constant, low-level hissing coming from the bathroom. My half-asleep brain ran through the possibilities: ghost, pipe burst, house sinking into the earth. Turns out, it was the toilet. Just... running. Endlessly refilling itself like it had somewhere to be.
I did what any reasonable person would do — I jiggled the handle. It stopped for about 10 seconds, then started right back up. Great. So I jiggled it harder. Same result. I spent the rest of that night with a towel stuffed behind the handle to keep it in the "right" position, which is the plumbing equivalent of putting a Band-Aid on a broken leg.
The next morning, I finally looked inside the tank — something I'd never actually done before in my life. And you know what? It was way less mysterious than I expected. There are basically four parts in there, and one of them was clearly the problem. Twenty minutes and $8 later, the toilet was silent and I felt like a plumbing genius.
Here's everything I learned so you can skip the 2 AM panic stage and go straight to fixing it.
Why You Shouldn't Ignore a Running Toilet
I know, I know — it's easy to just tune it out. The sound becomes background noise after a while, and hey, the toilet still flushes, so what's the big deal?
The big deal is your water bill. A running toilet can waste 200 gallons of water per day. That's not a typo. Depending on your local water rates, that's an extra $50-70 per month just flowing straight into the sewer. Over a year, you could be flushing $600-800+ down the drain — literally.
I found this out the hard way when I got a water bill that was almost double the usual amount. I thought there was a billing error. Nope. Just my toilet, silently hemorrhaging water for weeks while I kept jiggling the handle and moving on with my life.
What's Actually Inside Your Toilet Tank
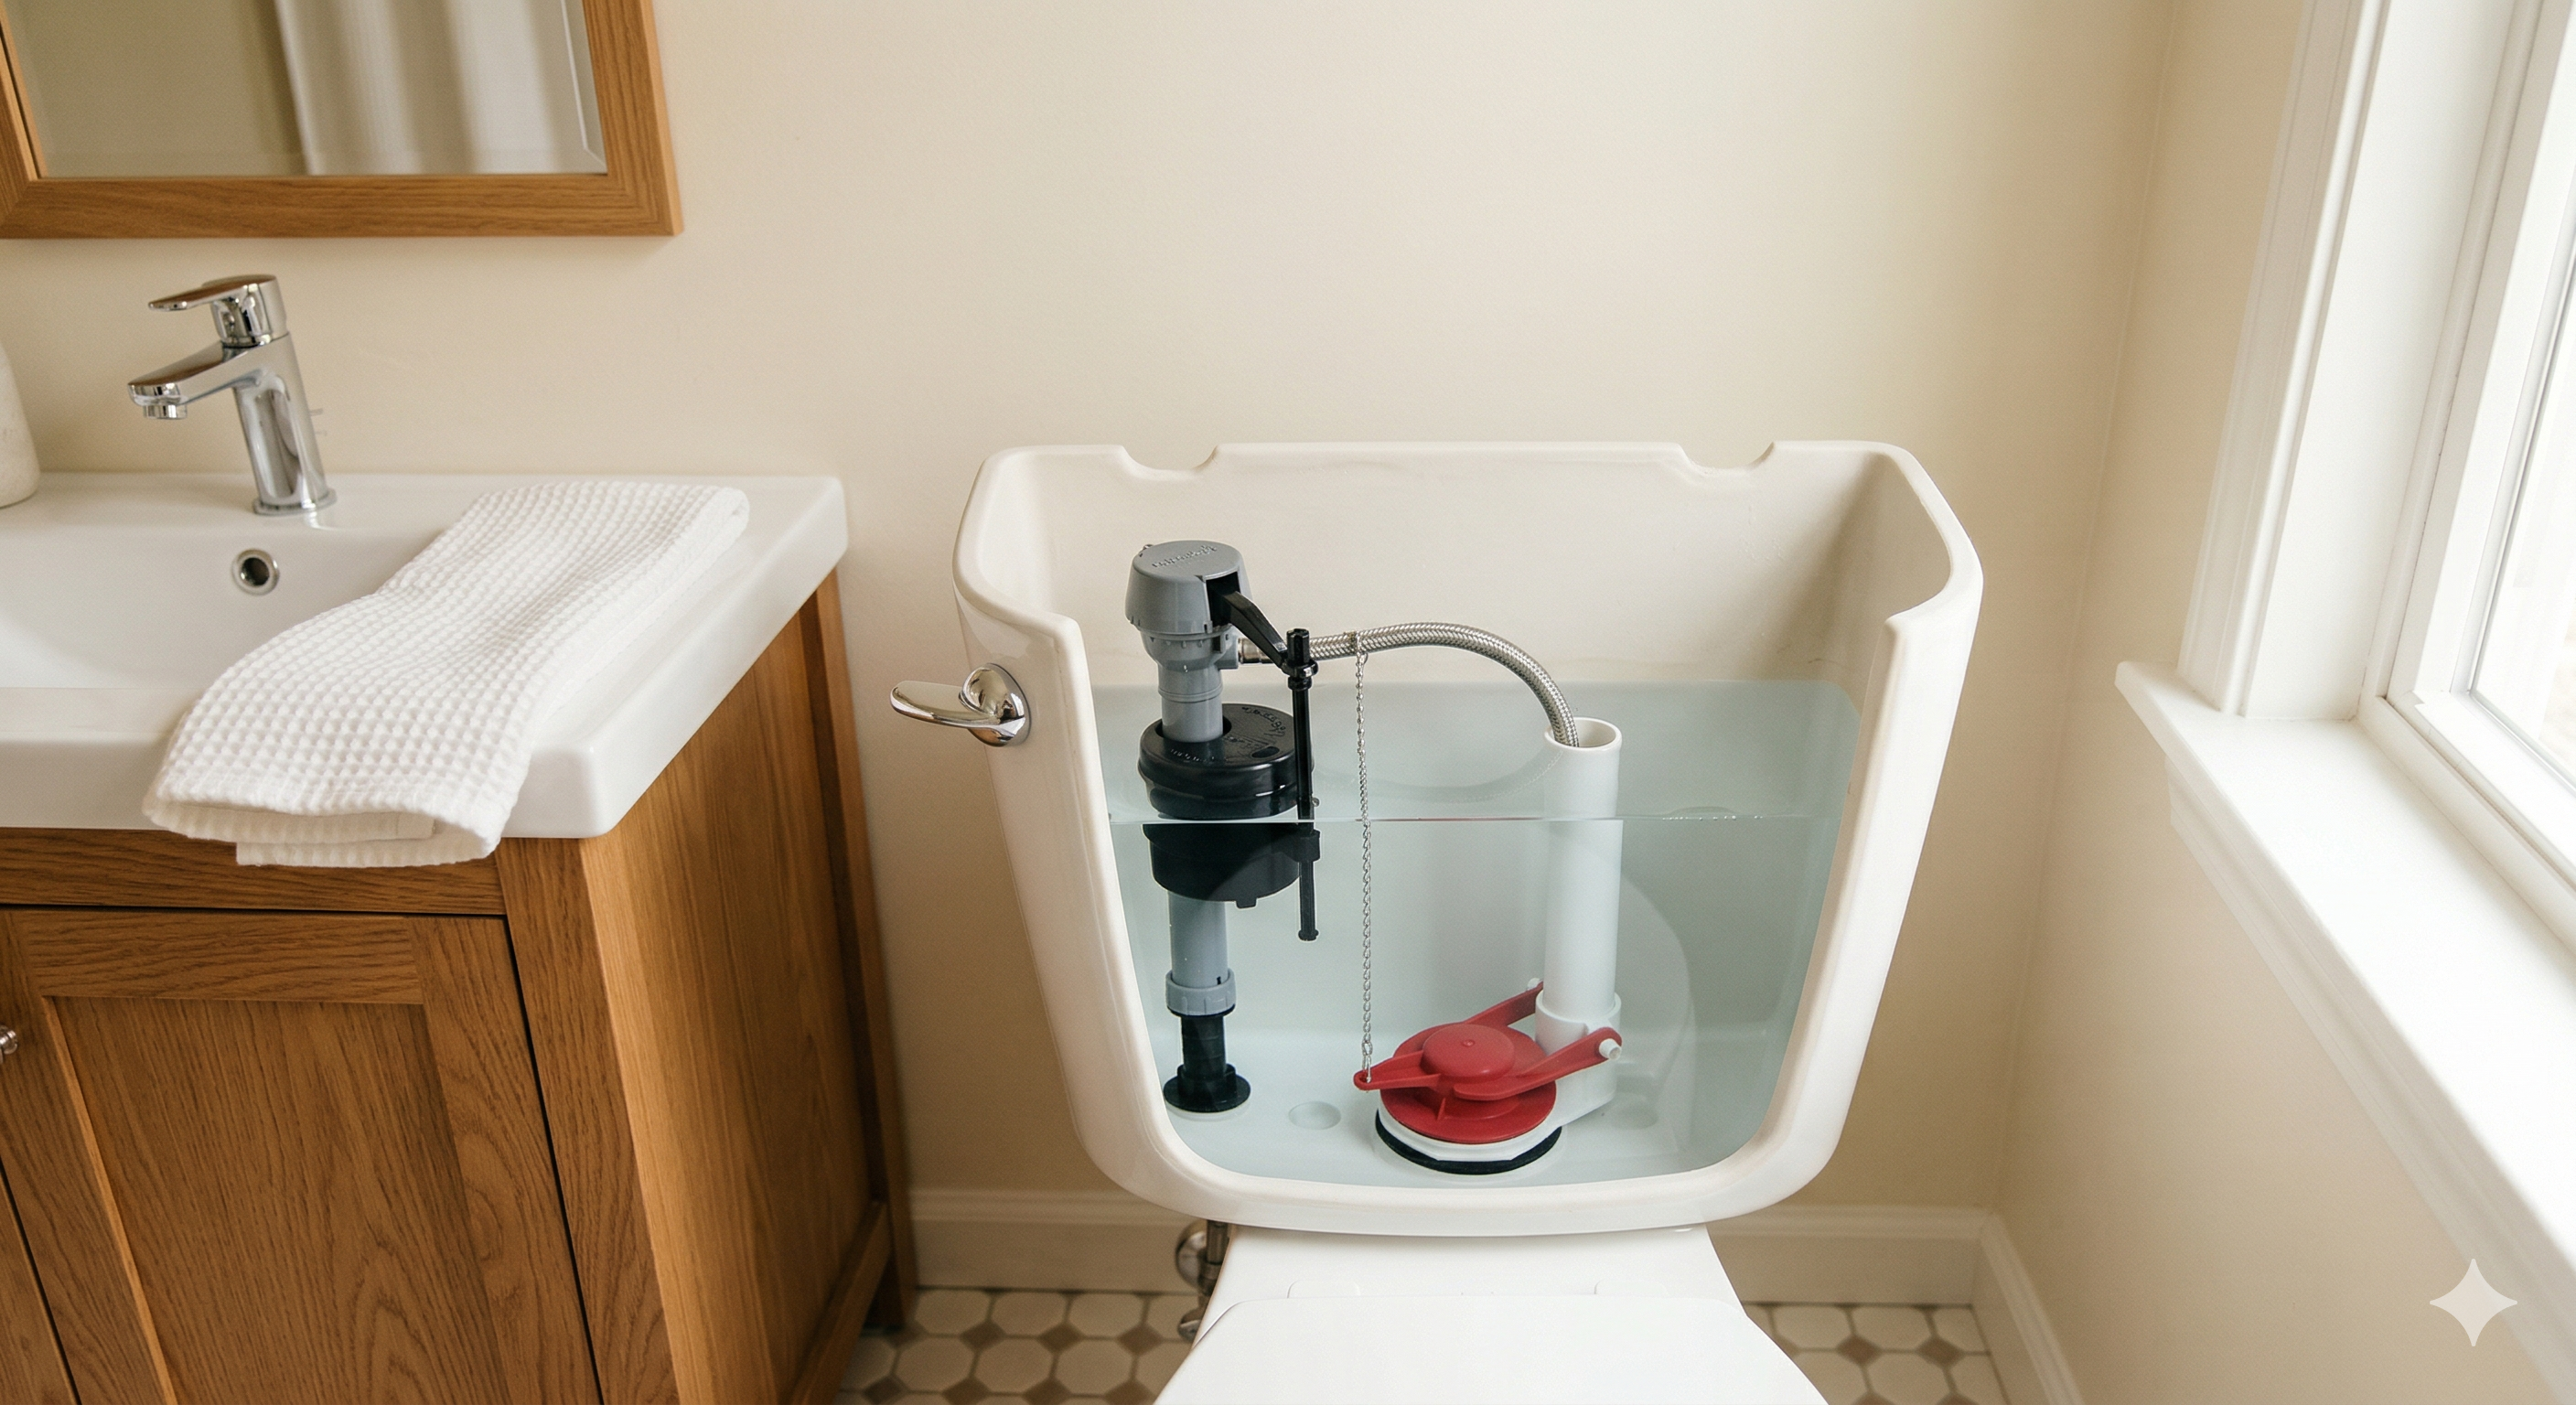
Before we fix anything, let's demystify what's going on in there. Take the tank lid off (it just lifts straight up — no screws or anything) and look inside. You'll see four main parts:
- The Flapper — A rubber disc at the bottom of the tank that seals the water in. When you flush, it lifts up and lets water rush into the bowl, then drops back down to seal. This is the most common culprit.
- The Fill Valve — The tall mechanism on the left side. This controls water flowing into the tank after a flush. When it malfunctions, water runs non-stop.
- The Float — Either a ball on an arm or a cylinder that rides up and down on the fill valve. It tells the fill valve when the tank is full and to stop filling.
- The Overflow Tube — The open pipe in the center. If the water level gets too high, it drains excess water into the bowl as a safety measure. If you see water constantly flowing into this tube, your float is set too high.
That's it. Four parts. One of them is causing your problem, and we're about to figure out which one.
Step 1: Diagnose the Problem (The Food Coloring Test)
Figure Out What's Actually Broken
Before you buy any parts or start unscrewing things, take two minutes to figure out exactly what's wrong. This saves you a trip back to the hardware store.
The food coloring test:
- Remove the tank lid and drop 5-6 drops of food coloring into the tank water
- Don't flush. Just wait 15 minutes
- Check the toilet bowl
If the bowl water is now colored: Your flapper is leaking. Water is seeping past the seal and into the bowl, which triggers the fill valve to keep refilling. This is the most common cause of running toilets by far.
If the bowl water is clear: Look inside the tank. Is water flowing over the top of the overflow tube? If yes, your float is set too high. If water isn't overflowing but the fill valve is still running, the fill valve itself needs replacing.
Quick Check: Also look at the chain connecting the flush handle to the flapper. If it's tangled or too short, it might be holding the flapper slightly open. Sometimes the fix is literally just untangling a chain. I've been there.
Step 2: Replace the Flapper (Most Common Fix)
What You'll Need
- Universal toilet flapper ($5-8)
- A towel
- Your hands (no tools required)
Swap the Flapper
This is the fix that solved my 2 AM mystery, and it's almost embarrassingly simple.
- Turn off the water supply. Find the valve behind the toilet (usually on the wall near the floor) and turn it clockwise until it stops. This shuts off water to the tank.
- Flush the toilet. This empties most of the water from the tank. Soak up any remaining water with a towel or sponge if needed.
- Remove the old flapper. Unhook the chain from the flush lever. Then pull the flapper's ears off the pegs on the sides of the overflow tube. It'll come right off.
- Take the old flapper to the store (or just buy a universal one). Most hardware stores carry universal flappers that fit the vast majority of toilets. The Fluidmaster 502 is a safe bet.
- Install the new flapper. Hook the ears over the pegs on the overflow tube. Reconnect the chain to the flush lever — leave about half an inch of slack.
- Turn the water back on. Let the tank fill, then flush a few times to test. Listen for silence. Sweet, beautiful silence.
Heads Up: If you have a Kohler, American Standard, or Toto toilet, check if it uses a proprietary flapper before buying a universal one. Some newer models have brand-specific designs. The model number is usually stamped inside the tank.
Step 3: Adjust the Float (If Water Overflows)
Lower the Water Level
If your diagnosis showed water running over the overflow tube, the fix is even simpler — your float just needs adjusting.
If you have a ball float (a rubber ball on the end of a metal arm):
- Gently bend the metal arm downward about half an inch
- Flush and watch the water level — it should stop about an inch below the top of the overflow tube
- Bend more if needed
If you have a cylinder float (a plastic cylinder that slides up and down on the fill valve):
- Find the adjustment clip or screw on the float — it's usually a metal spring clip on the side
- Pinch the clip and slide the float down about half an inch
- Flush and check the water level
The water level should sit about 1 inch below the top of the overflow tube. Mark the tube with a marker if it helps you eyeball it.
Pro Tip: If you have a fill valve with a screw on top, you can turn that screw to adjust the water level too. Clockwise lowers the level, counterclockwise raises it. Half turns at a time — small adjustments go a long way.
Step 4: Replace the Fill Valve (The Nuclear Option)
Swap the Entire Fill Valve
If the flapper is fine and the float adjustment didn't help, the fill valve itself is worn out. This sounds intimidating, but it's honestly just unscrewing one thing and screwing in another.
What You'll Need
- Fluidmaster 400A fill valve ($8-12)
- Adjustable pliers or a wrench
- A towel and a small bucket
- Turn off the water supply and flush to empty the tank. Soak up remaining water with a towel.
- Disconnect the water supply line from the bottom of the fill valve (underneath the tank). Have a bucket ready — some water will come out.
- Remove the old fill valve. Unscrew the locknut on the outside bottom of the tank (counterclockwise). Lift the old valve straight out.
- Adjust the new valve's height. Most fill valves are adjustable — twist the shaft so the top of the valve sits about an inch above the overflow tube.
- Insert the new valve through the hole in the tank. Hand-tighten the locknut from underneath. Then give it a quarter turn with pliers — don't overtighten or you'll crack the tank.
- Reconnect the water supply line. Hand-tight plus a quarter turn with pliers.
- Connect the refill tube. Clip the small rubber tube from the fill valve onto the overflow tube. This refills the bowl after each flush.
- Turn the water on slowly and check for leaks at the connections. If dry, you're done.
Important: Do not overtighten the locknut on the bottom of the tank. Porcelain cracks easily, and a cracked tank means a new toilet. Hand-tight plus a quarter turn is all you need.
Quick Diagnosis Cheat Sheet
| Symptom | Likely Cause | Fix | Cost |
|---|---|---|---|
| Toilet runs intermittently (phantom flush) | Leaking flapper | Replace flapper | $5-8 |
| Water constantly flows into overflow tube | Float set too high | Adjust float | Free |
| Hissing sound that won't stop | Fill valve not shutting off | Replace fill valve | $8-12 |
| Handle must be jiggled to stop running | Chain too long or tangled | Adjust or shorten chain | Free |
| Toilet runs after replacing flapper | Corroded flush valve seat | Clean with emery cloth or replace flush valve | $2-25 |
When to Actually Call a Plumber
I'm all about DIY, but there are a few situations where calling a professional makes sense:
- The tank is cracked. If you see water leaking from the tank itself (not the connections), that's a replacement, not a repair.
- The toilet rocks on the floor. This could mean a broken flange or wax ring issue — getting that wrong can cause serious water damage.
- You've replaced the flapper AND the fill valve and it still runs. There might be a crack in the flush valve or an issue deeper in the plumbing.
- Multiple toilets are running. This could indicate a water pressure problem that's beyond a single-toilet fix.
A plumber visit for a toilet issue typically runs $150-300. But if you can fix it yourself with an $8 flapper? That's a win worth celebrating.
Prevent It From Happening Again
After my midnight toilet saga, I started doing a couple of things to avoid repeat performances:
- Replace the flapper every 3-4 years. Rubber degrades over time, especially if you use drop-in tank cleaners (those blue tablets). Mark your calendar or set a reminder.
- Don't use drop-in tank cleaners. They speed up flapper deterioration significantly. If you want a clean bowl, use a gel that sticks to the rim instead.
- Do the food coloring test once a year. Takes two minutes. If color shows up in the bowl, replace the flapper before it becomes a bigger problem.
- Listen. If you hear your toilet refilling when nobody has flushed it, that's a phantom flush — your flapper is starting to go. Fix it now before it gets worse.
Money Saved: Since I started doing my own toilet repairs, I've fixed three running toilets across our house and my parents' place. Total spent: about $25. Total saved in plumber bills: at least $500. Total saved on water: probably another $200+. Not bad for a guy who didn't know what a flapper was six months ago.
Frequently Asked Questions
How much water does a running toilet waste?
A running toilet can waste 200 gallons per day or more, which adds up to over $50 per month on your water bill depending on local rates. Fixing it immediately saves real money.
How do I know which part is causing the problem?
Do the food coloring test: add a few drops to the tank and wait 15 minutes without flushing. If color appears in the bowl, the flapper is leaking. If water is running over the overflow tube, the float needs adjusting. If neither, the fill valve is likely the culprit.
Do I need to turn off the water to fix a running toilet?
For a flapper replacement or fill valve swap, yes — turn off the supply valve behind the toilet by turning it clockwise. For a simple float adjustment, you can leave the water on.
How often should I replace toilet flappers?
Toilet flappers typically last 3-5 years before the rubber degrades. If you use drop-in tank cleaners, they degrade faster. Replacing the flapper every 3 years as preventive maintenance can save you from surprise water waste.
What if the toilet still runs after replacing the flapper?
If a new flapper doesn't fix it, the flush valve seat — the ring the flapper sits on — may be corroded or warped. Try cleaning it with an emery cloth. If that doesn't work, you may need to replace the entire flush valve, which is a bigger job but still DIY-able.
Should I just replace the whole toilet instead?
If your toilet is over 20 years old and having frequent issues, replacing it might make sense — newer models use significantly less water. But if it's a single running issue, a $10-15 repair is always worth trying first.