I built my first raised garden bed three years ago, and I got almost everything wrong. I used untreated pine because it was cheap, didn't put anything under it to block weeds, and filled it with the cheapest bags of topsoil I could find at the hardware store. By August, the pine was already starting to rot. By the following spring, weeds were growing up through the bottom faster than anything I'd actually planted. And the soil — which looked fine going in — had compacted into something resembling concrete that drained about as well as a swimming pool.
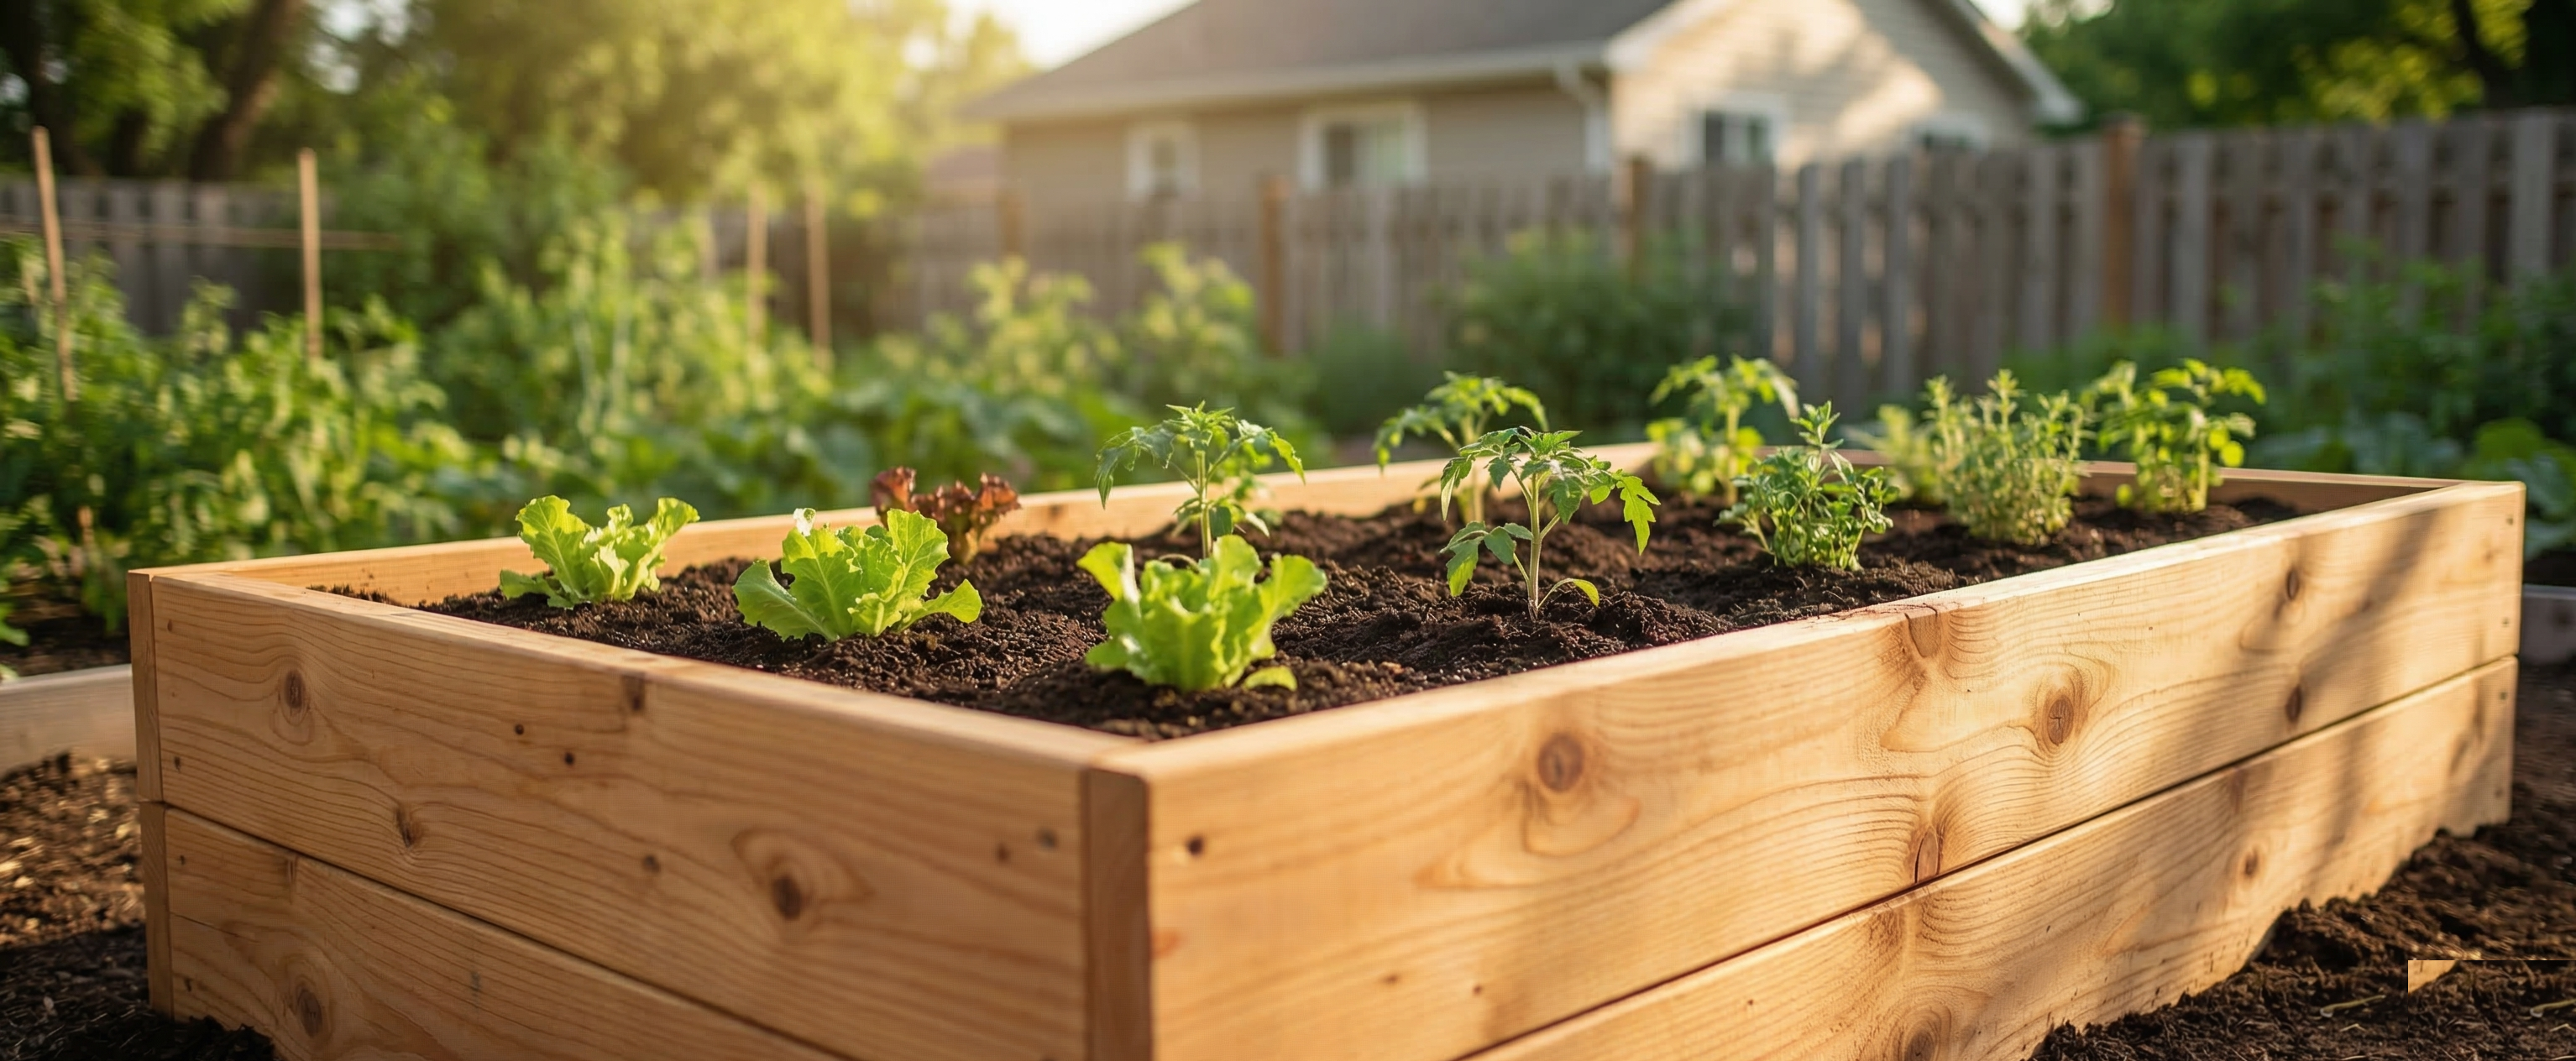
So I tore the whole thing out and started over. The second time around, I did my research. Cedar boards, cardboard underneath, a proper soil mix. That bed is still going strong, and it's where most of our tomatoes, herbs, and salad greens come from every summer. The difference between a raised bed that works and one that falls apart comes down to a few decisions you make at the beginning — and none of them are complicated.
Here's exactly how to build a raised garden bed that will last, what to fill it with so your plants actually thrive, and what to grow first if you've never gardened before.
Why Raised Beds in the First Place?
Before we get into the build, it's worth understanding why raised beds are worth the effort compared to just planting directly in the ground. The short answer is that they solve most of the problems that make gardening frustrating for beginners.
First, you control the soil. Most yards have either heavy clay that drains poorly, sandy soil that doesn't hold moisture, or compacted ground that roots struggle to penetrate. With a raised bed, you start with a custom soil mix that's perfect for growing vegetables from day one. No amending, no testing, no fighting your native soil for years.
Second, drainage is almost automatic. Because the soil sits above grade, excess water drains out naturally. Waterlogged roots are one of the most common reasons garden plants die, and raised beds virtually eliminate that problem.
Third, your back will thank you. Working at even 10-12 inches off the ground makes a meaningful difference in how much bending and kneeling you do. I didn't think this mattered until I spent an entire weekend planting and weeding an in-ground garden and could barely move on Monday.
And fourth, they look neat. A well-built raised bed gives your yard a structured, intentional look. There's something satisfying about clean lines and contained growing space — especially if the rest of your landscaping is, shall we say, still a work in progress.
Choosing Your Lumber: What Actually Matters
This is the decision that affects how long your bed lasts, what it costs, and whether you need to worry about chemicals leaching into your food. Here's an honest comparison of the most common options.
| Material | Cost (4x8 bed) | Lifespan | Notes |
|---|---|---|---|
| Cedar | $80-160 | 10-15 years | Naturally rot-resistant, no chemicals, weathers to a nice silver-gray |
| Untreated pine/spruce | $30-60 | 2-5 years | Cheapest option but rots fast in soil contact |
| Pressure-treated lumber | $40-80 | 15-20 years | Modern PT (ACQ) is considered food-safe; avoid pre-2004 PT lumber (CCA/arsenic) |
| Composite/plastic lumber | $120-250 | 20+ years | Won't rot, but expensive and can warp in heat |
| Galvanized steel | $100-300 | 20+ years | Trendy, durable, heats up soil faster in spring — but also cooks roots in summer |
My recommendation for most people is cedar. Yes, it costs more than pine upfront, but the cost-per-year is actually lower because it lasts three to five times longer. And there's no ambiguity about food safety — it's just wood that happens to be naturally resistant to rot and insects.
If cedar is hard to find in your area or the price is eye-watering (it varies a lot by region), modern pressure-treated lumber is a reasonable alternative. The copper-based preservatives used since 2004 are considered safe for vegetable gardens by both the EPA and most extension services. But I understand if you'd rather not take the chance — that's a personal call.
Never use old pressure-treated wood, railroad ties, or painted/stained lumber for garden beds. Pre-2004 pressure-treated wood was preserved with chromated copper arsenate (CCA), which contains arsenic. Railroad ties are soaked in creosote. Any of these will leach harmful chemicals into the soil where you're growing food.
The Build: A Simple 4x8 Raised Bed
A 4x8 bed is the standard size for a reason. It's big enough to grow a meaningful amount of food, but narrow enough that you can reach the center from either side without stepping into the bed (which compacts the soil). It also works perfectly with standard lumber lengths — an 8-foot board doesn't need to be cut for the long sides, and one board cut in half gives you both short sides.
This build uses a single-board height (about 5.5 inches), which works great for lettuce, herbs, radishes, and other shallow-rooted crops. If you want to grow tomatoes, peppers, carrots, or other deeper-rooted vegetables, double up and build it two boards high (about 11 inches). I'll note where the double-height version differs.
What you'll need
Materials
- Three 8-foot cedar 2x6 boards — two for the long sides, one cut in half for the short sides (for double height: six boards)
- One 4-foot cedar 4x4 post — cut into four 12-inch corner posts (for double height: four 22-inch posts)
- 2.5-inch exterior wood screws — stainless steel or coated (about 24-32 screws total)
- Cardboard — enough to cover the bottom of the bed (free from any moving or appliance store)
Tools
- Drill/driver with a Phillips or square drive bit
- Tape measure
- Speed square or carpenter's square
- Circular saw or miter saw (a handsaw works too — it's just slower)
- Level (a 4-foot level is ideal)
- Pencil
- Countersink/pre-drill bit (optional but prevents splitting)
If you don't own a circular saw and don't want to buy one for this project, most lumber yards and big-box stores will make straight cuts for you — sometimes for free, sometimes for a small per-cut fee. Just bring your cut list and have them do it while you wait.
Cut list
Single Height (5.5")
| Piece | Material | Length | Qty |
|---|---|---|---|
| Long sides | 2x6 cedar | 96" (8 feet) | 2 |
| Short sides | 2x6 cedar | 45" * | 2 |
| Corner posts | 4x4 cedar | 12" | 4 |
* The short sides are 45 inches, not 48 inches (4 feet), to account for the thickness of the two long-side boards (each 1.5" thick). This gives you a finished exterior dimension of 4 feet by 8 feet.
For a double-height bed (11"): Double the 2x6 quantities (four long sides, four short sides) and cut the corner posts to 22 inches instead of 12 inches. Everything else stays the same — you're just stacking two courses of boards.
Planning a different size? Use our Raised Bed Cut List Calculator to get a custom cut list, shopping list, soil estimate, and cost breakdown for any dimensions.
Building Plans
4' x 8' Cedar Raised Garden Bed
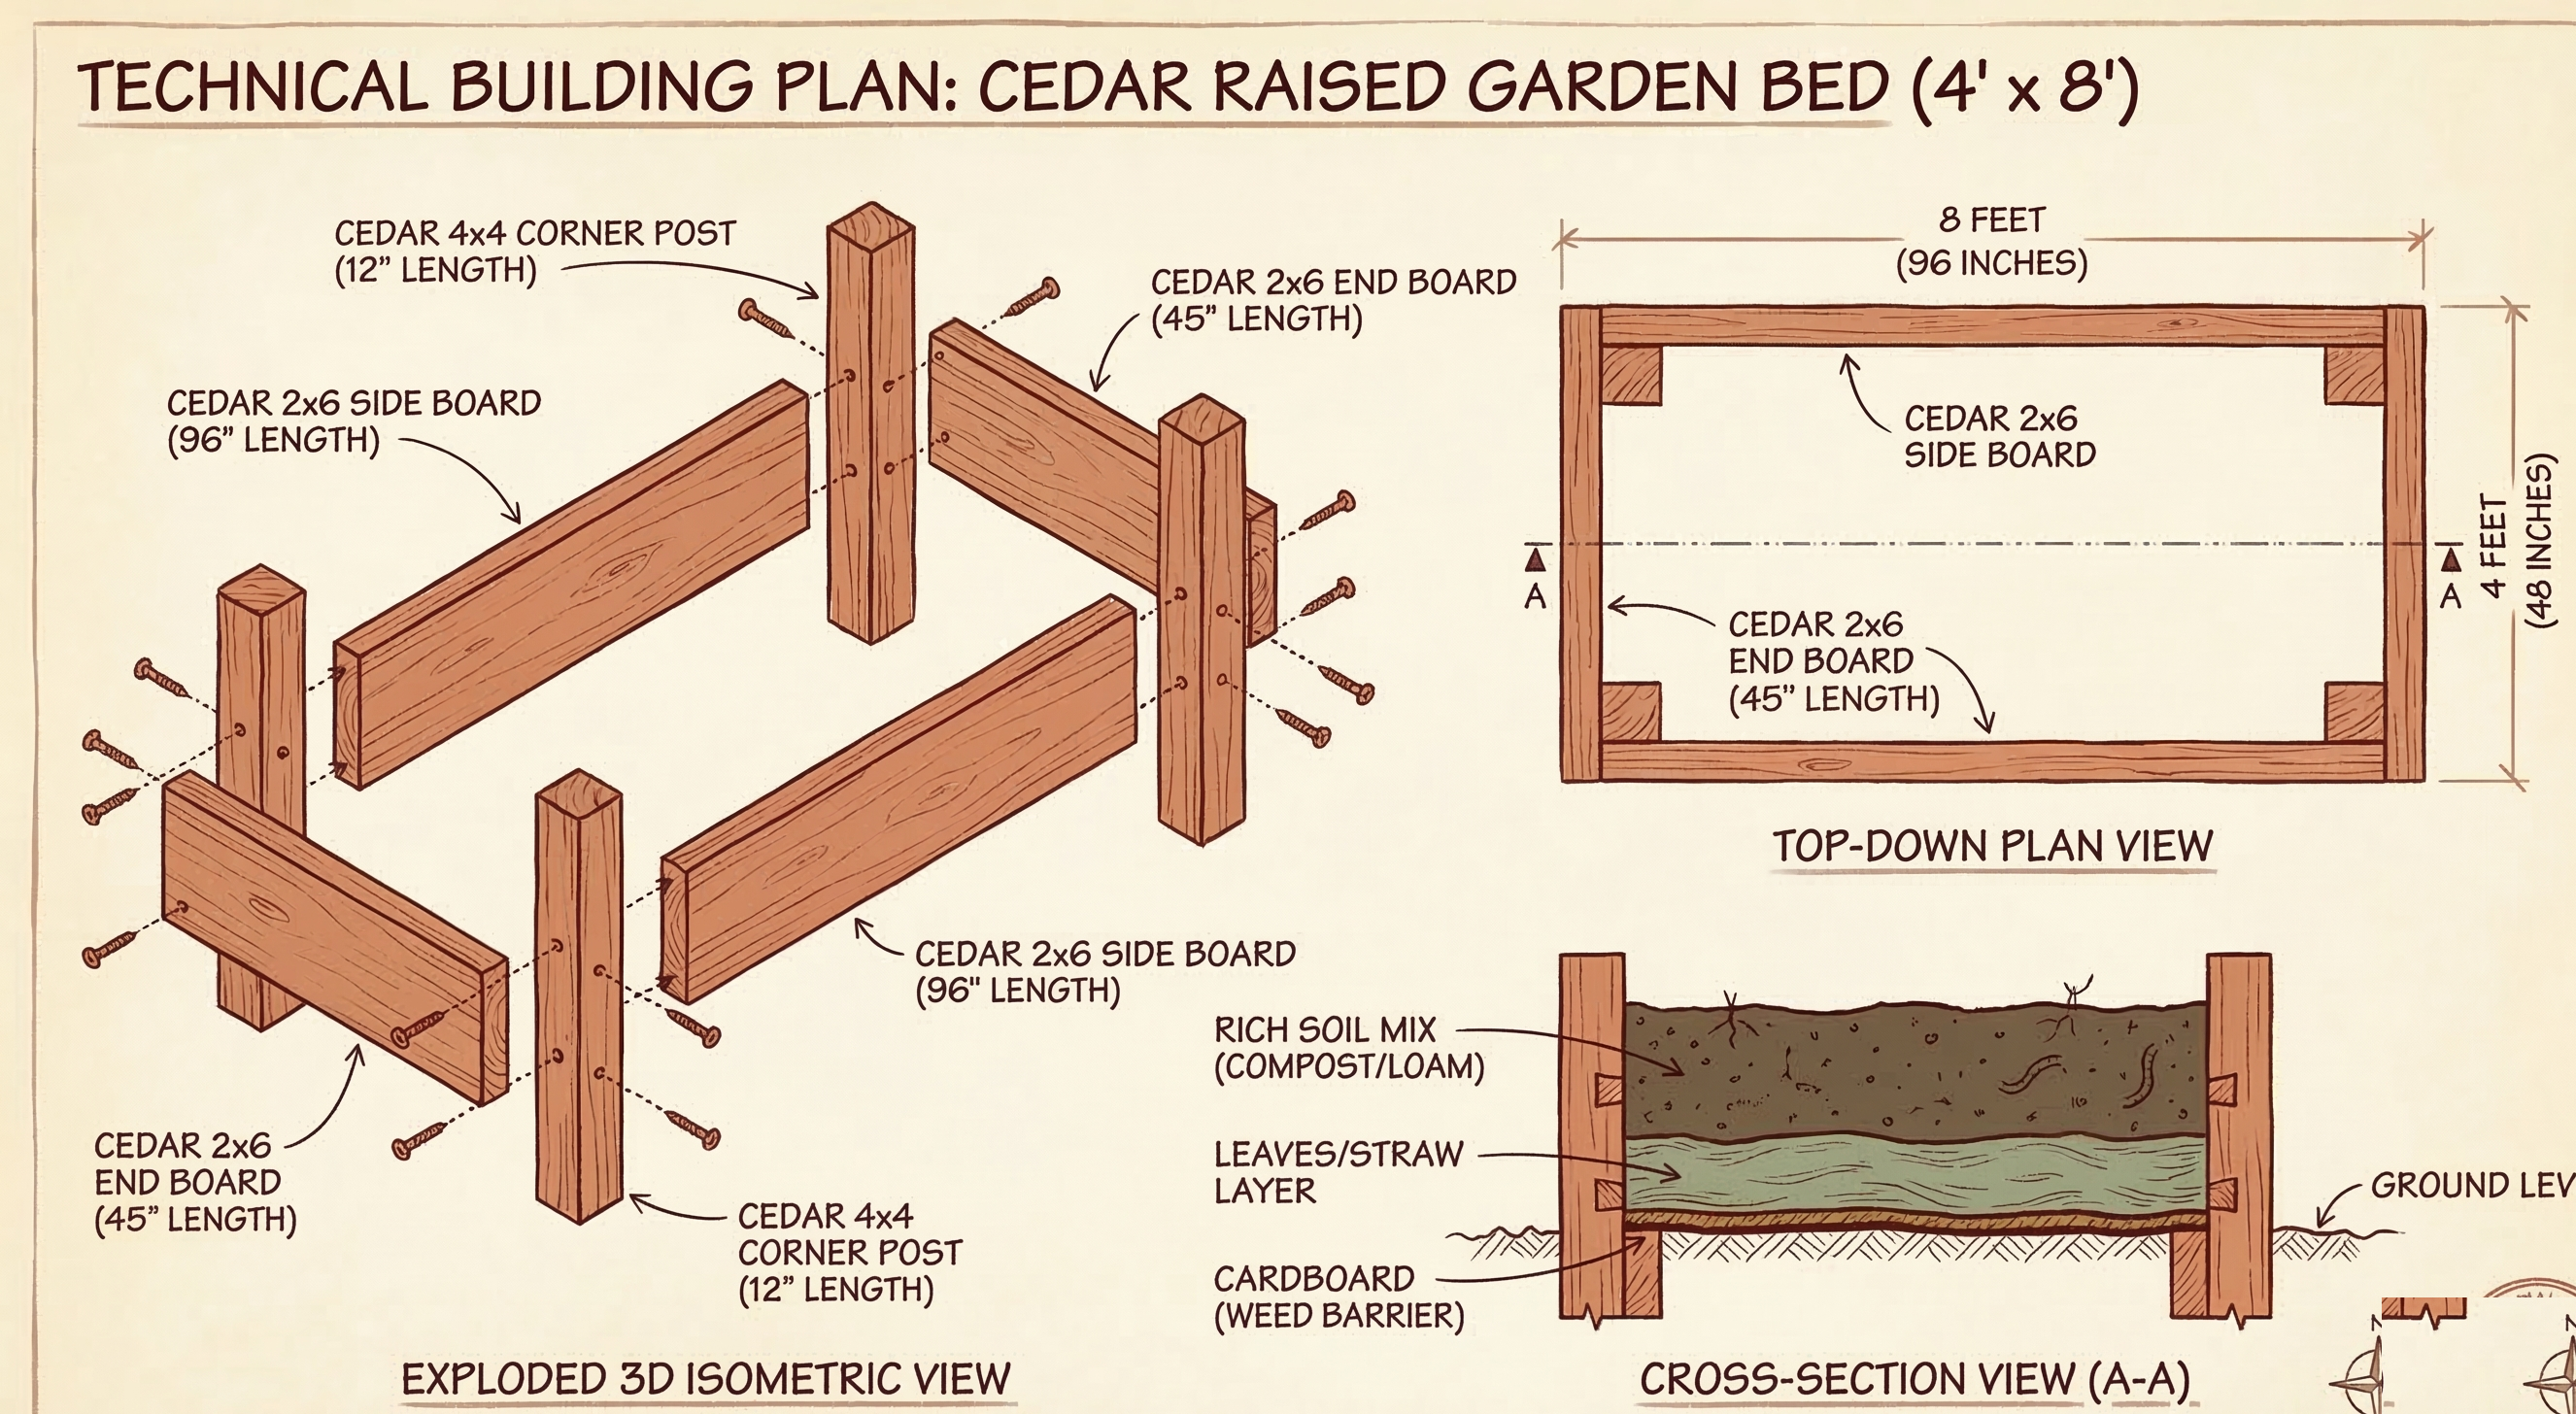
Finished exterior dimensions: 4' wide × 8' long × 5.5" tall (or 11" for double-height). Not drawn to exact scale.
Step 1: Cut your lumber
If you're having the store make your cuts, hand them the cut list and you can skip this section. If you're doing it yourself, the only cuts you need to make are the short side pieces and the corner posts.
For the short sides, measure 45 inches from one end of your third 2x6 and cut. That gives you one short side with a leftover piece of about 51 inches — plenty to cut the second 45-inch short side from the same board. You'll have about 6 inches of scrap left over, which is barely enough for anything, but hang on to it anyway. Scrap cedar makes decent shims, test pieces for stain colors, or plant markers.
For the corner posts, cut the 4x4 into four equal 12-inch pieces (or 22-inch pieces if you're building double-height). Cedar cuts easily, so a handsaw works fine here if you don't have a power saw.
Step 2: Assemble the corners
This is where the whole thing comes together, and it's simpler than you might think. Lay out one of the long side boards on a flat surface. Stand a corner post at each end, flush with the top edge and the end of the board. The post should stick out below the bottom edge of the board — that extra length will be buried in the ground to keep the bed from shifting.
Pre-drill two pilot holes through the board into the post at each corner. This is important with cedar, which splits easily if you try to drive screws in without pre-drilling. Then drive in your 2.5-inch exterior screws. Two screws per corner is plenty for a single-height bed.
Do the same thing with the second long side board and two more corner posts. Now you have two identical long-side assemblies — each board with a post at each end.
Step 3: Connect the short sides
Stand the two long-side assemblies up on their edges, parallel to each other, about 45 inches apart. Take one of the short-side boards and fit it between the corner posts at one end. The short board butts up against the inside of the long boards, with the corner posts sandwiched in between. Pre-drill and screw through the short side board into the corner posts, two screws per post.
Repeat at the other end. That's it — you have a rectangular box. Pick it up (it's surprisingly light when empty) and make sure it's square. Measure diagonally from corner to corner in both directions. If the two diagonal measurements are equal, the bed is square. If they're off by more than a quarter inch, loosen the screws on one short side, adjust, and re-tighten.
For the double-height version: Build two identical single-height frames. Stack the second frame on top of the first, align the corners, and screw through the upper boards into the corner posts of the lower frame. Or use the longer 22-inch posts and attach all four boards (two per side) to the same posts during assembly.
Step 4: Place and level
Carry the assembled bed to your chosen spot. For placement, the main thing you need is at least six to eight hours of direct sunlight per day. Most vegetables need full sun to produce well. Also think about convenience — put it somewhere you can reach easily with a hose and that you'll actually walk past regularly. A garden bed you can't see from the house is a garden bed you'll forget about.
Set the bed down and check it with a level along all four sides and diagonally. If the ground isn't perfectly level (it won't be), you have two options. For small variations, dig down a bit on the high side until the frame sits level. For sloped ground, you can partially bury the downhill side and leave the uphill side more exposed. As long as the bed is roughly level, water will distribute evenly and you won't have one end drowning while the other dries out.
Once you're happy with the position and it's level, press the corner posts into the soil. If your ground is soft, they'll push in by hand. If it's hard, tap them in with a rubber mallet or a scrap piece of wood and a hammer. The posts don't need to go deep — just enough to anchor the bed so it doesn't shift over time.
Step 5: Lay the base
Before you add any soil, cover the ground inside the bed with cardboard. Flatten out some large boxes, remove any tape and stickers, and lay the cardboard so it overlaps by a few inches at the seams. The cardboard serves two purposes: it blocks existing weeds and grass from growing up into your bed, and it decomposes over the growing season, adding organic matter to the soil below.
Some people use landscape fabric instead of cardboard, and it works fine for weed suppression. But I prefer cardboard because it breaks down naturally. Landscape fabric eventually needs to be removed (it doesn't decompose), and roots can get tangled in it, making future maintenance annoying.
If you have a lot of grass or aggressive weeds where the bed is going, you can mow as short as possible and lay the cardboard right over it. By the time the cardboard breaks down, the grass underneath will be dead.
What to Fill It With (This Is Where Most People Get It Wrong)
Here's the thing about soil: what comes in a bag labeled "topsoil" at the hardware store is usually not great for raised beds on its own. It's often dense, slow-draining, and low in organic matter. Filling your bed with nothing but bagged topsoil is the single most common raised bed mistake, and it leads to waterlogged roots, poor plant growth, and a lot of frustration. I know because I did exactly this with my first bed.
The soil in a raised bed needs to do three things well: drain quickly so roots don't sit in water, hold enough moisture so you're not watering twice a day, and provide nutrients for plant growth. Getting all three right means mixing several components.
The soil recipe
The mix I use and recommend is straightforward:
- 60% topsoil — provides the base structure and minerals
- 30% compost — provides nutrients, beneficial microbes, and improves drainage
- 10% peat moss or coconut coir — retains moisture and keeps the mix light and fluffy
For a single-height 4x8 bed (5.5 inches deep), you need roughly 13 cubic feet of material total. For a double-height bed (11 inches), you need about 26 cubic feet — that's just under one cubic yard. A cubic yard sounds like a lot, but it's basically one pickup truck load.
Buying soil: bags vs. bulk
Here's where the cost difference gets significant. A 1-cubic-foot bag of topsoil at a hardware store costs $3-7. For a double-height bed, you'd need about 15-16 bags of topsoil alone — that's $45-100+ just for the base soil, plus bags of compost and peat moss on top of that. Total cost in bags: $100-200+.
Alternatively, call a local landscape supply company and order a cubic yard of "garden mix" or "raised bed mix" delivered. Most places sell a pre-blended topsoil-compost mix for $30-80 per cubic yard, and delivery usually runs $30-60 on top of that. Total cost for bulk: $60-140, and it's better quality than the bagged stuff.
If you're only building one single-height bed, bags might make more sense since you need less material. For a double-height bed or multiple beds, bulk delivery is almost always the better deal.
The layering method
If you want to save money and you have access to some free organic materials, you can fill the bottom portion of your bed with rough organic matter before adding the soil mix. This is a simplified version of what's called "hugelkultur," and it's a great way to reduce how much purchased soil you need.
On top of the cardboard, add a 2-3 inch layer of any combination of: dried leaves, straw (not hay — hay has seeds), small twigs and sticks, grass clippings, or shredded newspaper. This layer will decompose slowly over the next year or two, feeding nutrients into the soil above it and improving drainage. Then fill the rest of the bed with your soil mix.
Don't go overboard with this layer — you still want at least 8-9 inches of actual soil mix for your plants to root into. The organic layer just saves you from buying as much soil and improves the bed's long-term fertility.
Water the soil before planting. After filling the bed, soak the soil thoroughly and let it settle for a day or two. The level will drop an inch or so as things settle — top it off with more mix before you plant. This prevents your soil level from dropping below the top of the boards after your first few waterings.
What to Plant First
If you've never gardened before, resist the urge to plant twenty different things in your first bed. Start with a few crops that are genuinely hard to mess up, get a successful harvest under your belt, and expand from there. A demoralizingly failed first garden is the number one reason people give up on growing their own food.
Easiest wins for beginners
- Lettuce and salad greens — Plant from seed, harvest in 30-45 days, grows in partial shade. Almost impossible to kill.
- Herbs (basil, cilantro, parsley, chives) — Start from nursery transplants for instant results. You'll use these in the kitchen constantly.
- Radishes — Seed to harvest in 25-30 days. The fastest reward in gardening. Great for kids and impatient adults.
- Bush beans — Drop seeds in the soil after your last frost, water occasionally, harvest six to eight weeks later. No trellising needed.
- Tomatoes — Buy a couple transplants from a nursery and give them the sunniest spot in the bed. They need more attention (watering, staking) but a single healthy tomato plant can produce 10-15 pounds of fruit.
- Zucchini — Famously productive. One plant will give you more zucchini than you know what to do with. Fair warning: you will end up leaving bags of zucchini on neighbors' porches.
For a 4x8 bed, a reasonable first planting might be: two or three tomato plants along the sunny end, a row of basil and cilantro, a section of lettuce mix, and some radishes or beans to fill the gaps. That gives you variety without overwhelming you with maintenance.
Timing matters
Don't plant anything outdoors until after your last frost date. This varies wildly by location. In Pennsylvania where I am, the last frost is typically mid-May — but I've been bitten by a late frost in early June before. Your local extension office website will tell you the average last frost date for your area. Cool-season crops like lettuce and radishes can go out a few weeks earlier, but tomatoes, basil, peppers, and beans need warm soil and warm nights.
Maintenance (It's Easier Than You Think)
Once your bed is built, filled, and planted, the ongoing work is minimal compared to an in-ground garden.
Watering: Raised beds dry out faster than in-ground gardens because the soil is exposed on the sides. During hot weather, you may need to water daily or every other day. Stick your finger into the soil about an inch deep — if it's dry, water. If it's damp, wait. A simple soaker hose laid across the bed and connected to a timer ($30 setup total) takes the guesswork out of this entirely and is one of the best investments you can make. If you want to go further, our drip irrigation guide walks you through a full automated setup.
Weeding: Almost nonexistent in the first year if you laid cardboard underneath. By the second year, you'll get some weeds, but the loose raised bed soil makes pulling them trivially easy compared to clay ground.
Feeding: Your initial compost-heavy soil mix has enough nutrients for the first growing season. In subsequent years, top-dress the bed with 2-3 inches of compost each spring before planting. That's it. No complicated fertilizer schedule needed.
End of season: After your last harvest in fall, pull out any dead plants and toss them in the compost pile. Cover the bed with a few inches of dried leaves or straw for the winter. This suppresses weeds, protects the soil from erosion, and adds organic matter as it breaks down — you're basically feeding your bed while you're inside drinking coffee and not thinking about gardening.
Cost Breakdown: DIY vs. Kit vs. Hiring Out
Here's what this project actually costs, with real numbers. I've priced everything for a standard double-height 4x8 cedar bed since that's what most people should build.
| Approach | Lumber/Frame | Soil Fill | Total |
|---|---|---|---|
| DIY (cedar, from this guide) | $100-200 | $60-150 | $160-350 |
| Pre-made cedar kit | $150-400 | $60-150 | $210-550 |
| Galvanized steel kit | $100-300 | $60-150 | $160-450 |
| Hire a landscaper | $300-800 (installed) | Often included | $300-800 |
The DIY route saves you anywhere from $50 to $400+ depending on what you'd otherwise buy or hire. And honestly, this is one of the easier woodworking projects you can do. If you can measure, cut a straight line, and drive screws, you can build a raised bed. The whole build takes two to three hours, tops — and most of that is making cuts and pre-drilling holes.
Common Mistakes to Avoid
I've made most of these so you don't have to.
Using cheap wood to save money. Untreated pine looks fine at the hardware store but rots in two to three years in soil contact. You'll spend more replacing the bed than you saved on lumber. Pay for cedar or go with modern pressure-treated.
Skipping the cardboard layer. Without a barrier, weeds and grass will push up through your bed by midsummer. Bermuda grass in particular will make your life miserable if you don't block it.
Filling with only topsoil. Pure topsoil compacts, drains poorly, and doesn't have enough organic matter for vegetables. Always mix in compost.
Building it too wide. If you can't reach the center of the bed from the edges, you'll end up stepping into the bed to plant, weed, and harvest. That compacts the soil, which defeats half the purpose of building a raised bed. Four feet wide is the max for most people.
Putting it in the shade. Most vegetables need at least six hours of direct sun per day. Eight is better. Check your spot by going out and looking at it at 9 AM, noon, and 3 PM on a sunny day. If it's shaded during two or more of those checks, pick a different location.
Planting too much too soon. An overplanted bed turns into a jungle by July, with plants competing for light, water, and nutrients. Follow the spacing guidelines on the seed packet or plant tag. I know it looks empty at first, but trust the process — those tiny transplants will fill in fast.
A raised garden bed is one of the most rewarding projects you can do around your house. The build is simple, the materials are affordable, and by midsummer you'll be eating food you grew yourself — which, no matter how many times it happens, never gets old. Start with one bed this spring. You'll probably be building a second one by fall.
Frequently Asked Questions
How much does it cost to build a raised garden bed?
A basic 4x8 cedar raised bed costs $80-200 for lumber and hardware, depending on your region and lumber prices. Filling it with soil adds another $50-150 depending on whether you buy bagged or bulk materials. A comparable pre-made kit costs $150-400+, and hiring a landscaper to build one runs $300-800.
What's the best wood for raised garden beds?
Cedar is the best all-around choice — it's naturally rot-resistant, lasts 10-15 years, and doesn't leach chemicals into the soil. Untreated pine is cheaper but only lasts 3-5 years. Modern pressure-treated lumber (post-2004) is considered food-safe by the EPA and most extension services, but some gardeners prefer to avoid it. Never use old pressure-treated wood (pre-2004) which may contain arsenic.
How deep should a raised garden bed be?
Most vegetables need 6-12 inches of soil depth. A single 2x6 board gives you about 5.5 inches, which works for lettuce, herbs, and radishes. For tomatoes, peppers, and root vegetables, stack two boards for 11 inches — enough for virtually any garden crop. Going deeper than 12 inches is unnecessary for most plants.
What's the cheapest way to fill a raised garden bed?
Buying soil in bulk from a landscape supply company is significantly cheaper than bags from a hardware store. A 4x8 bed that's 11 inches deep needs about 1 cubic yard of material. Bulk delivery costs $30-80 per cubic yard, while the same volume in bags costs $150-250. You can also layer free organic matter like leaves and straw on the bottom to reduce the amount of soil you need.